解题思路:
普通链表的节点定义如下:
Python
# Definition for a Node.
class Node:
    def __init__(self, x: int, next: 'Node' = None):
        self.val = int(x)
        self.next = next
Java
// Definition for a Node.
class Node {
    int val;
    Node next;
    public Node(int val) {
        this.val = val;
        this.next = null;
    }
}
C++
// Definition for a Node.
class Node {
public:
    int val;
    Node* next;
    Node(int _val) {
        val = _val;
        next = NULL;
    }
};
本题链表的节点定义如下:
Python
# Definition for a Node.
class Node:
    def __init__(self, x: int, next: 'Node' = None, random: 'Node' = None):
        self.val = int(x)
        self.next = next
        self.random = random
Java
// Definition for a Node.
class Node {
    int val;
    Node next, random;
    public Node(int val) {
        this.val = val;
        this.next = null;
        this.random = null;
    }
}
C++
// Definition for a Node.
class Node {
public:
    int val;
    Node* next;
    Node* random;
    Node(int _val) {
        val = _val;
        next = NULL;
        random = NULL;
    }
};
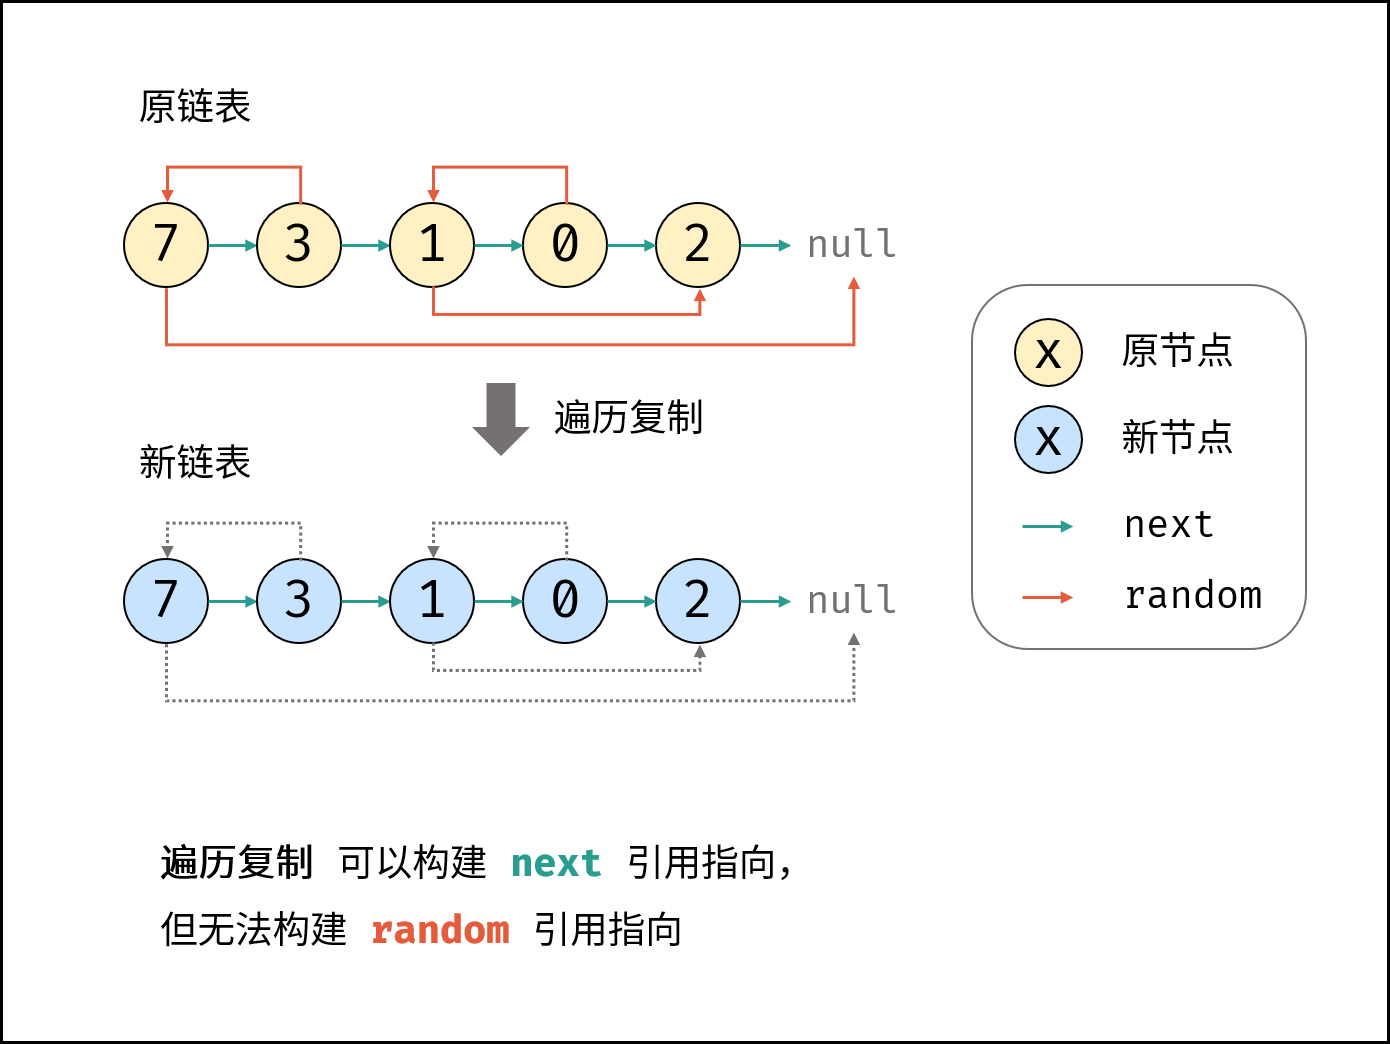
给定链表的头节点 head ,复制普通链表很简单,只需遍历链表,每轮建立新节点 + 构建前驱节点 pre 和当前节点 node 的引用指向即可。
本题链表的节点新增了 random 指针,指向链表中的 任意节点 或者 $null$ 。这个 random 指针意味着在复制过程中,除了构建前驱节点和当前节点的引用指向 pre.next ,还要构建前驱节点和其随机节点的引用指向 pre.random 。
本题难点: 在复制链表的过程中构建新链表各节点的 random 引用指向。
Python
class Solution:
    def copyRandomList(self, head: 'Node') -> 'Node':
        cur = head
        dum = pre = Node(0)
        while cur:
            node = Node(cur.val) # 复制节点 cur
            pre.next = node      # 新链表的 前驱节点 -> 当前节点
            # pre.random = '???' # 新链表的 「 前驱节点 -> 当前节点 」 无法确定
            cur = cur.next       # 遍历下一节点
            pre = node           # 保存当前新节点
        return dum.next
Java
class Solution {
    public Node copyRandomList(Node head) {
        Node cur = head;
        Node dum = new Node(0), pre = dum;
        while(cur != null) {
            Node node = new Node(cur.val); // 复制节点 cur
            pre.next = node;               // 新链表的 前驱节点 -> 当前节点
            // pre.random = "???";         // 新链表的 「 前驱节点 -> 当前节点 」 无法确定
            cur = cur.next;                // 遍历下一节点
            pre = node;                    // 保存当前新节点
        }
        return dum.next;
    }
}
C++
class Solution {
public:
    Node* copyRandomList(Node* head) {
        Node* cur = head;
        Node* dum = new Node(0), *pre = dum;
        while(cur != nullptr) {
            Node* node = new Node(cur->val); // 复制节点 cur
            pre->next = node;                // 新链表的 前驱节点 -> 当前节点
            // pre->random = "???";          // 新链表的 「 前驱节点 -> 当前节点 」 无法确定
            cur = cur->next;                 // 遍历下一节点
            pre = node;                      // 保存当前新节点
        }
        return dum->next;
    }
};
本文介绍 「哈希表」 ,「拼接 + 拆分」 两种方法。哈希表方法比较直观;拼接 + 拆分方法的空间复杂度更低。
方法一:哈希表
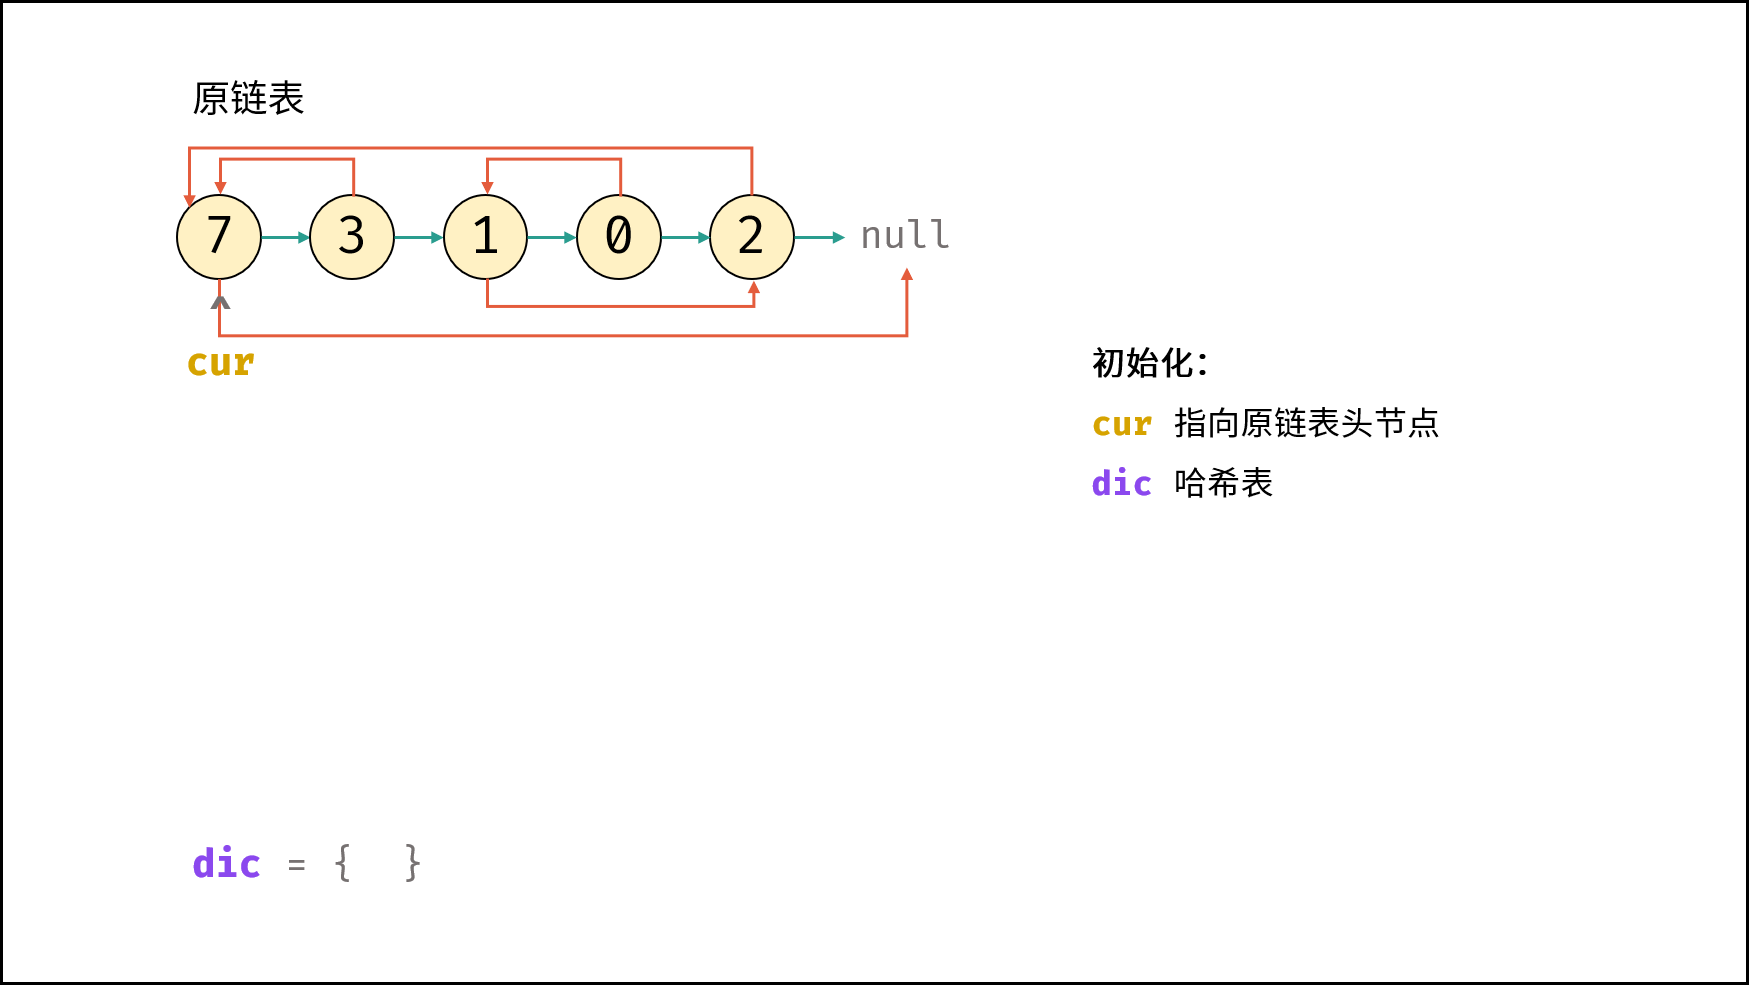
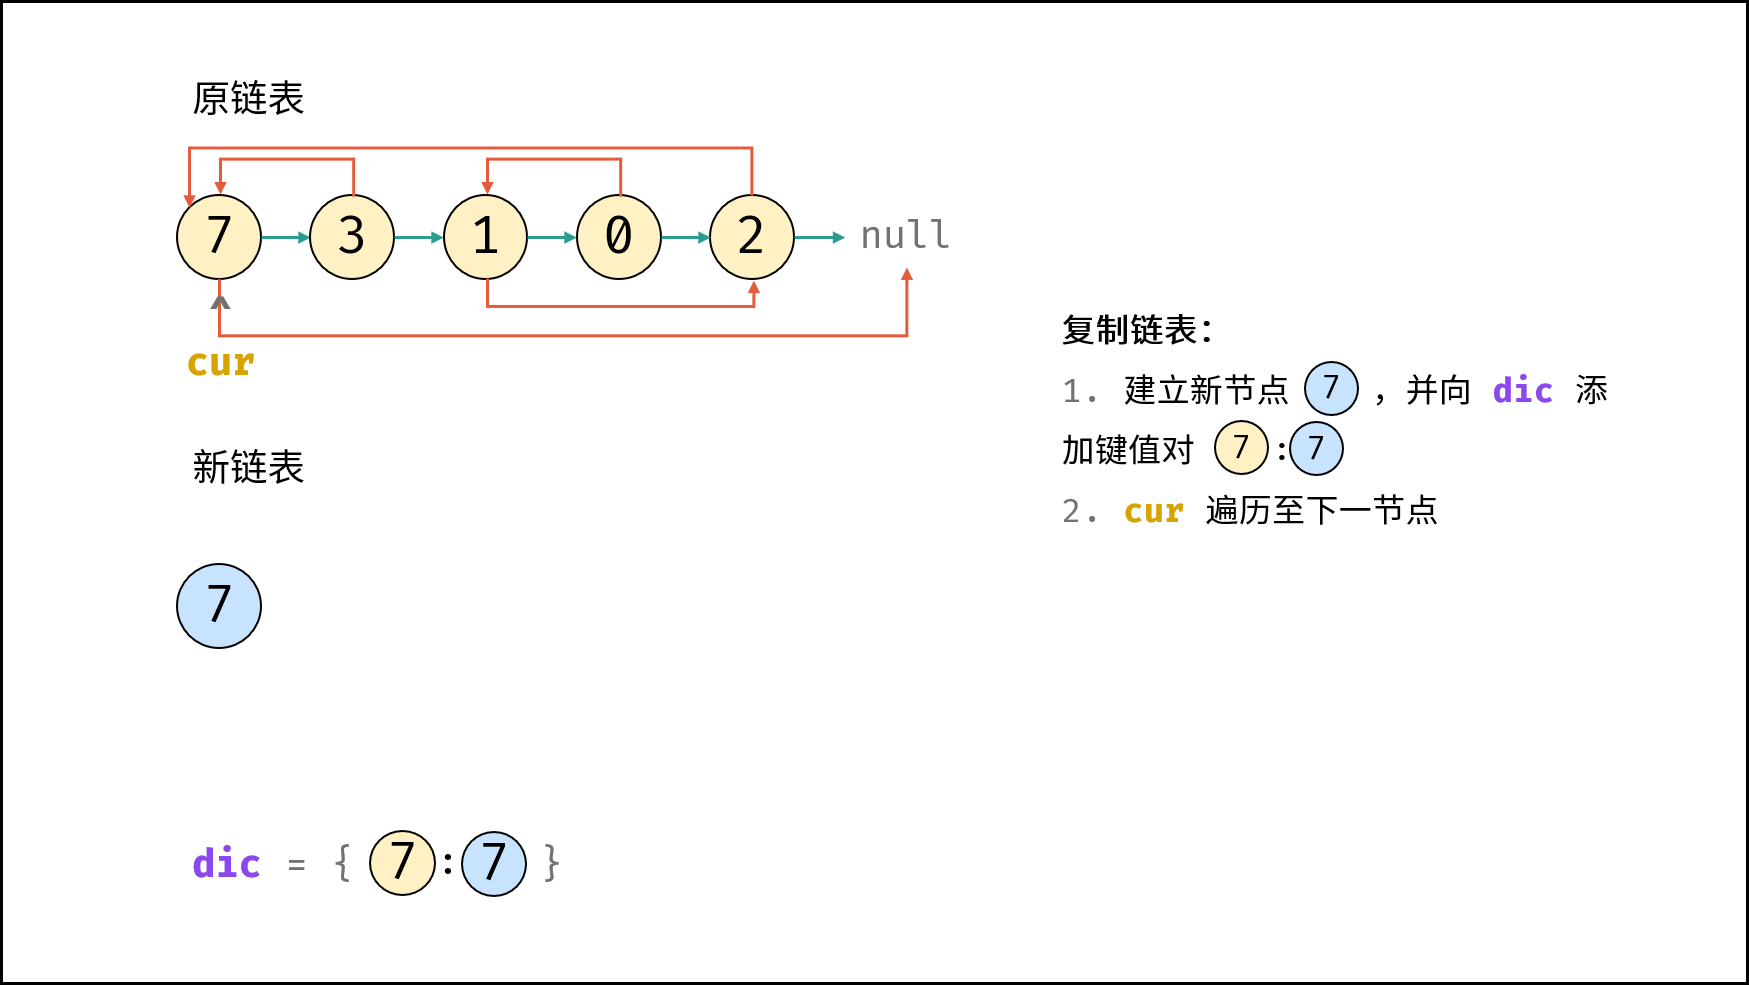
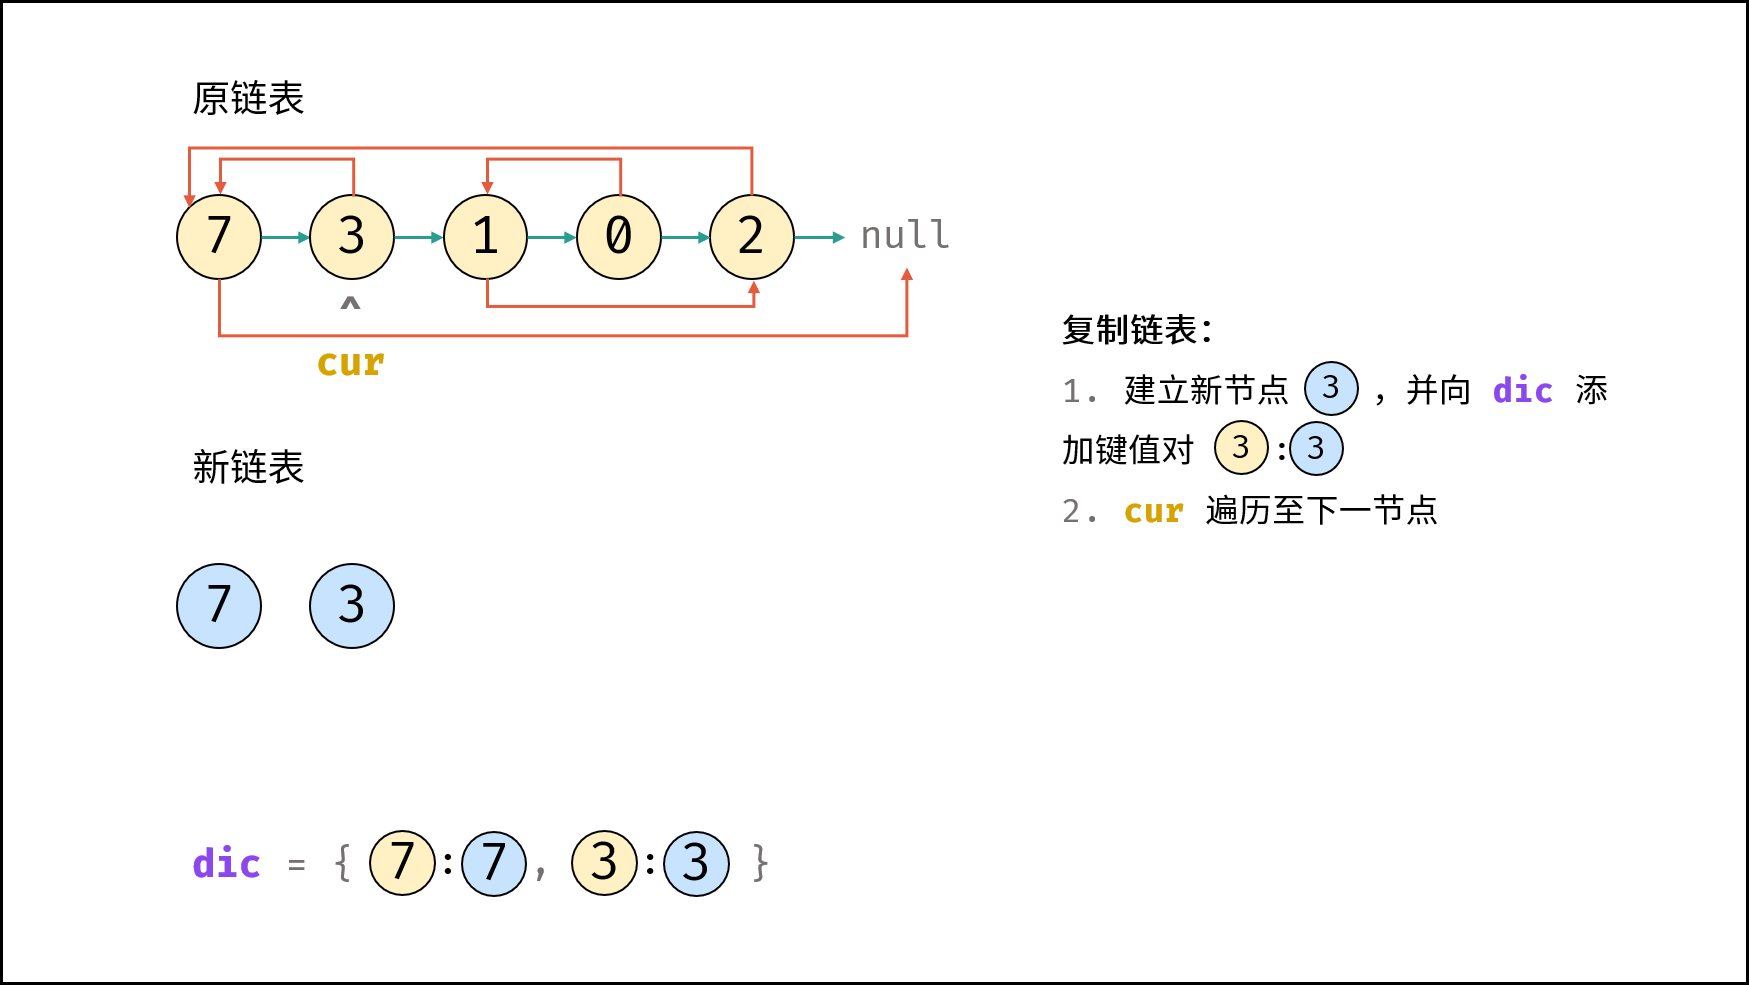
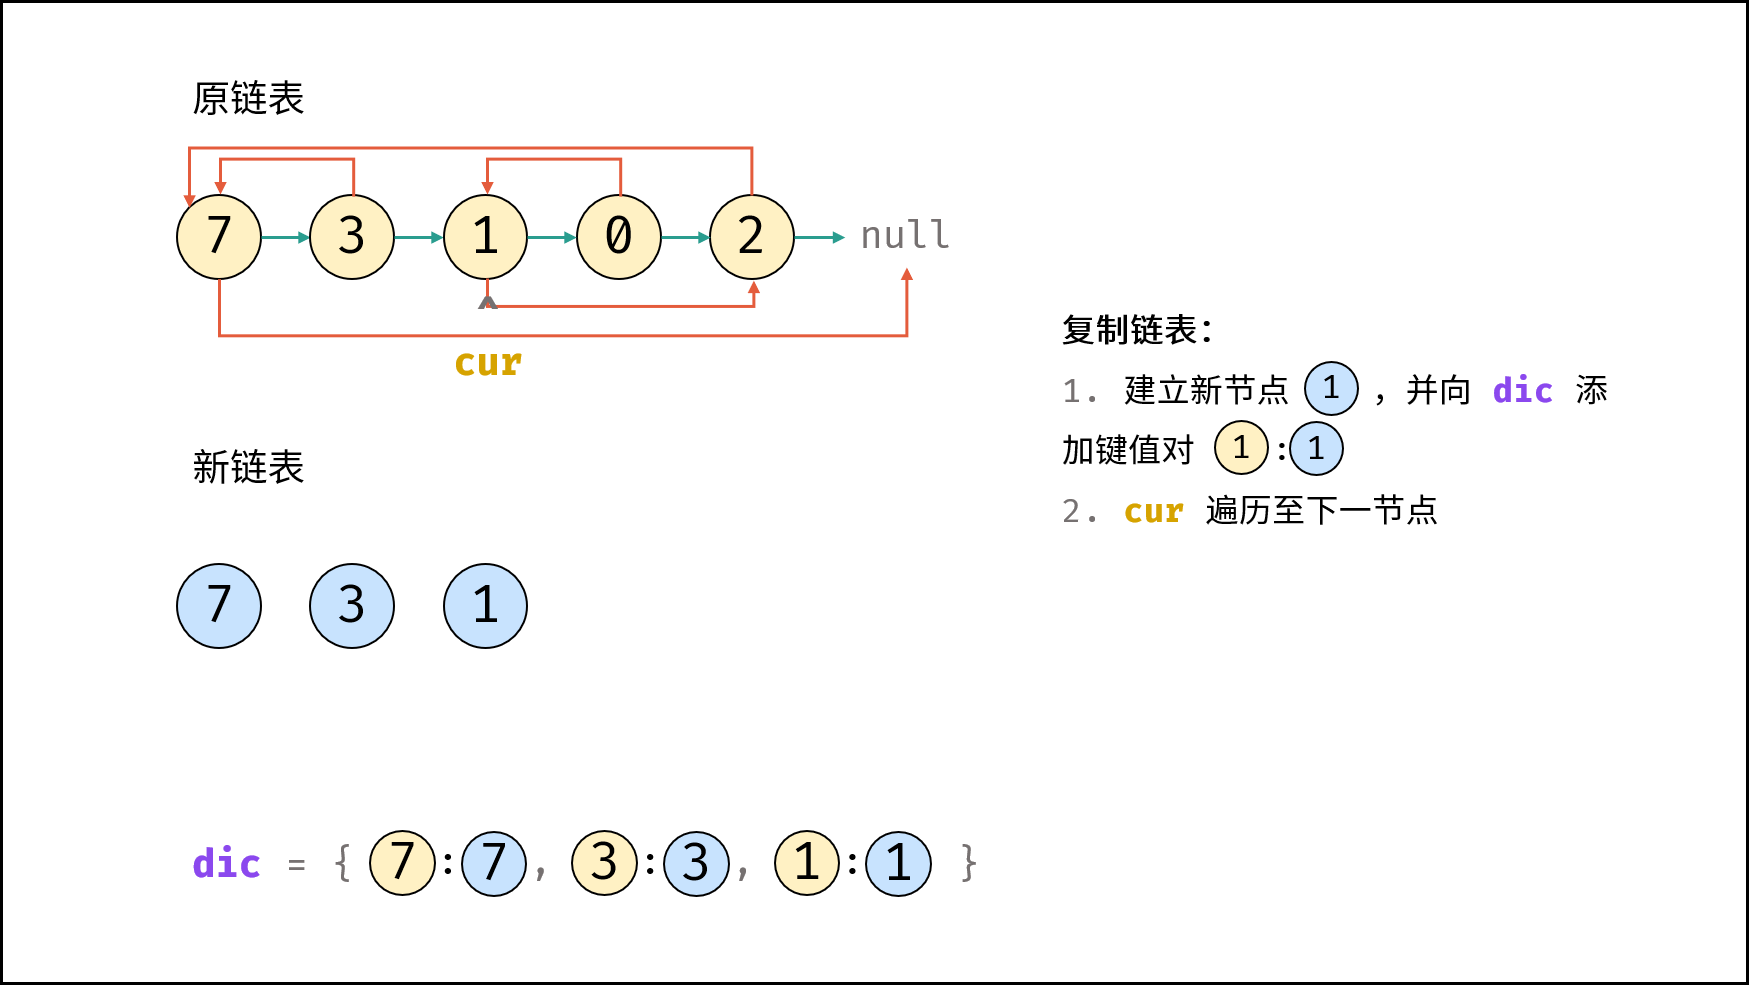
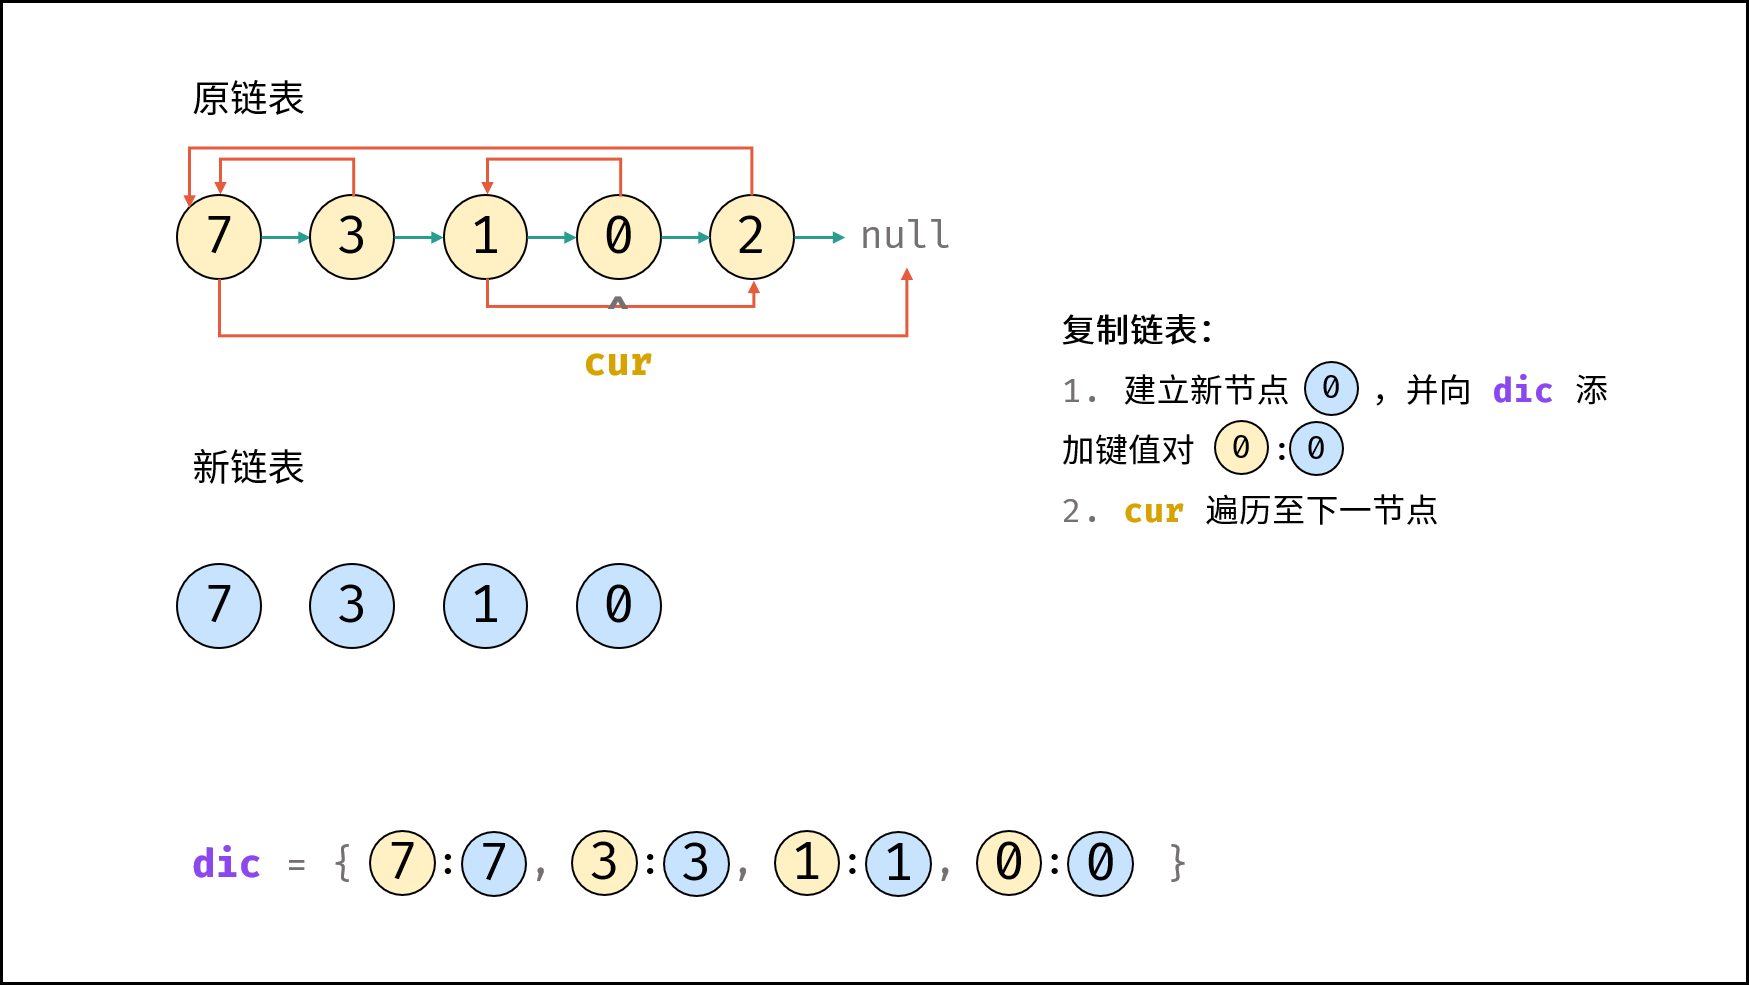
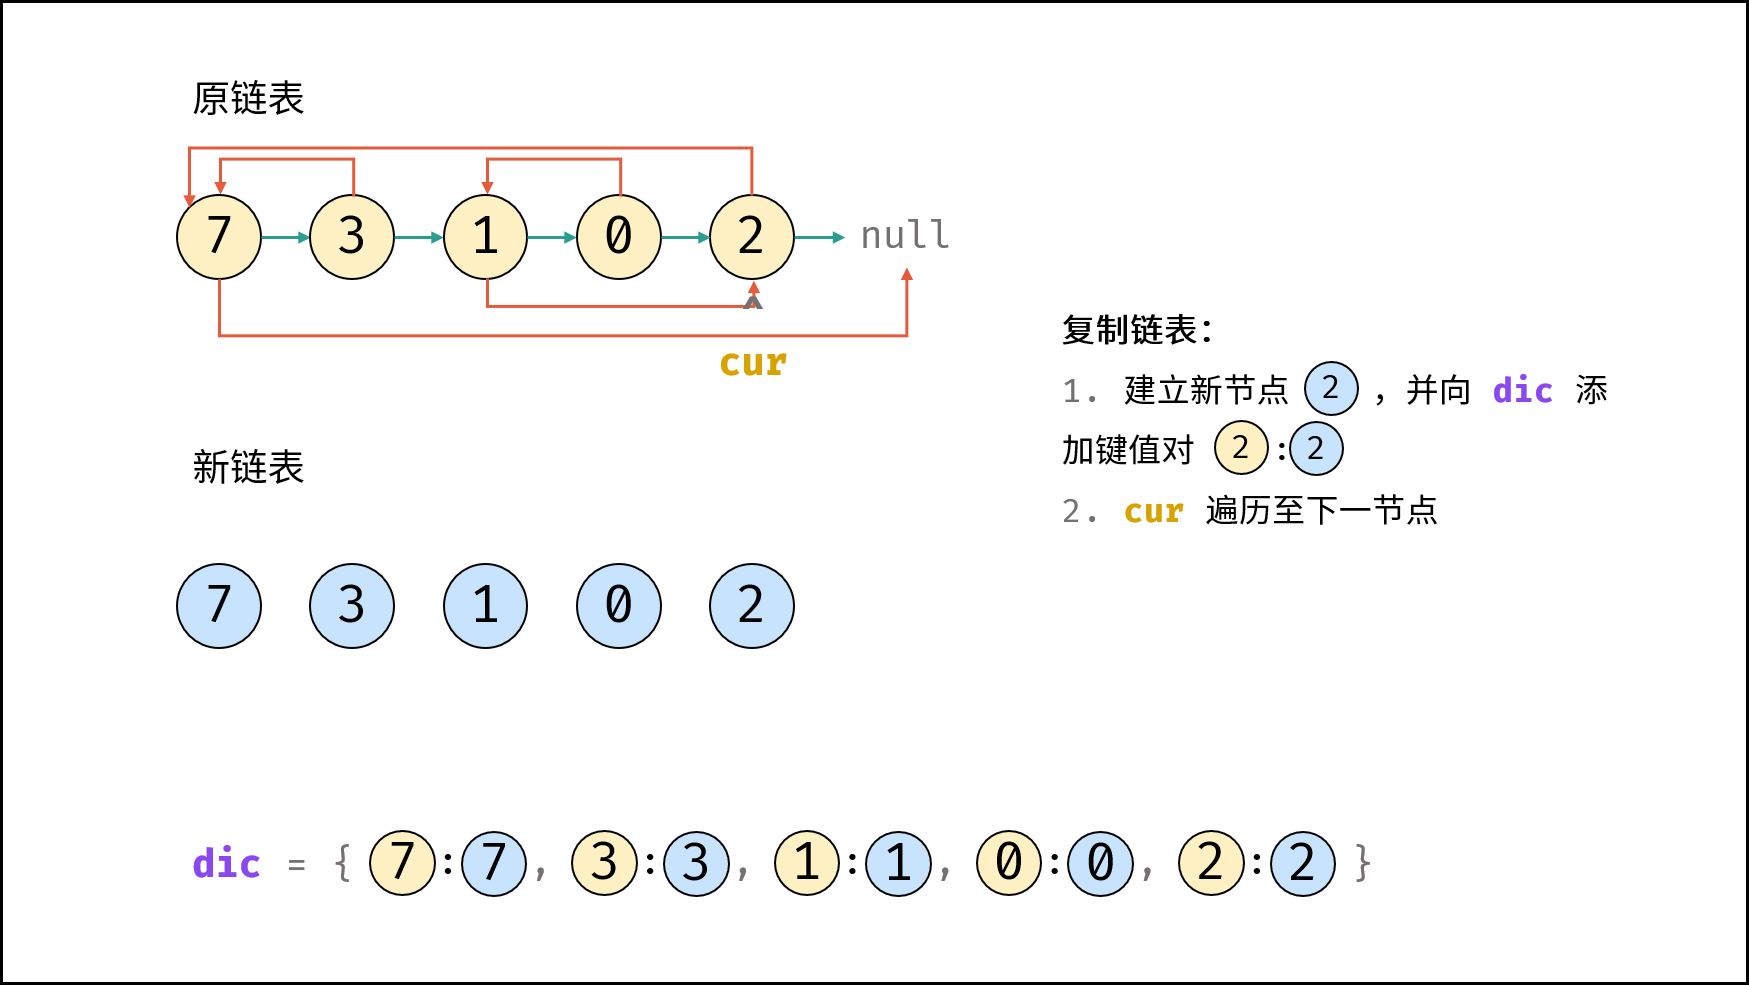
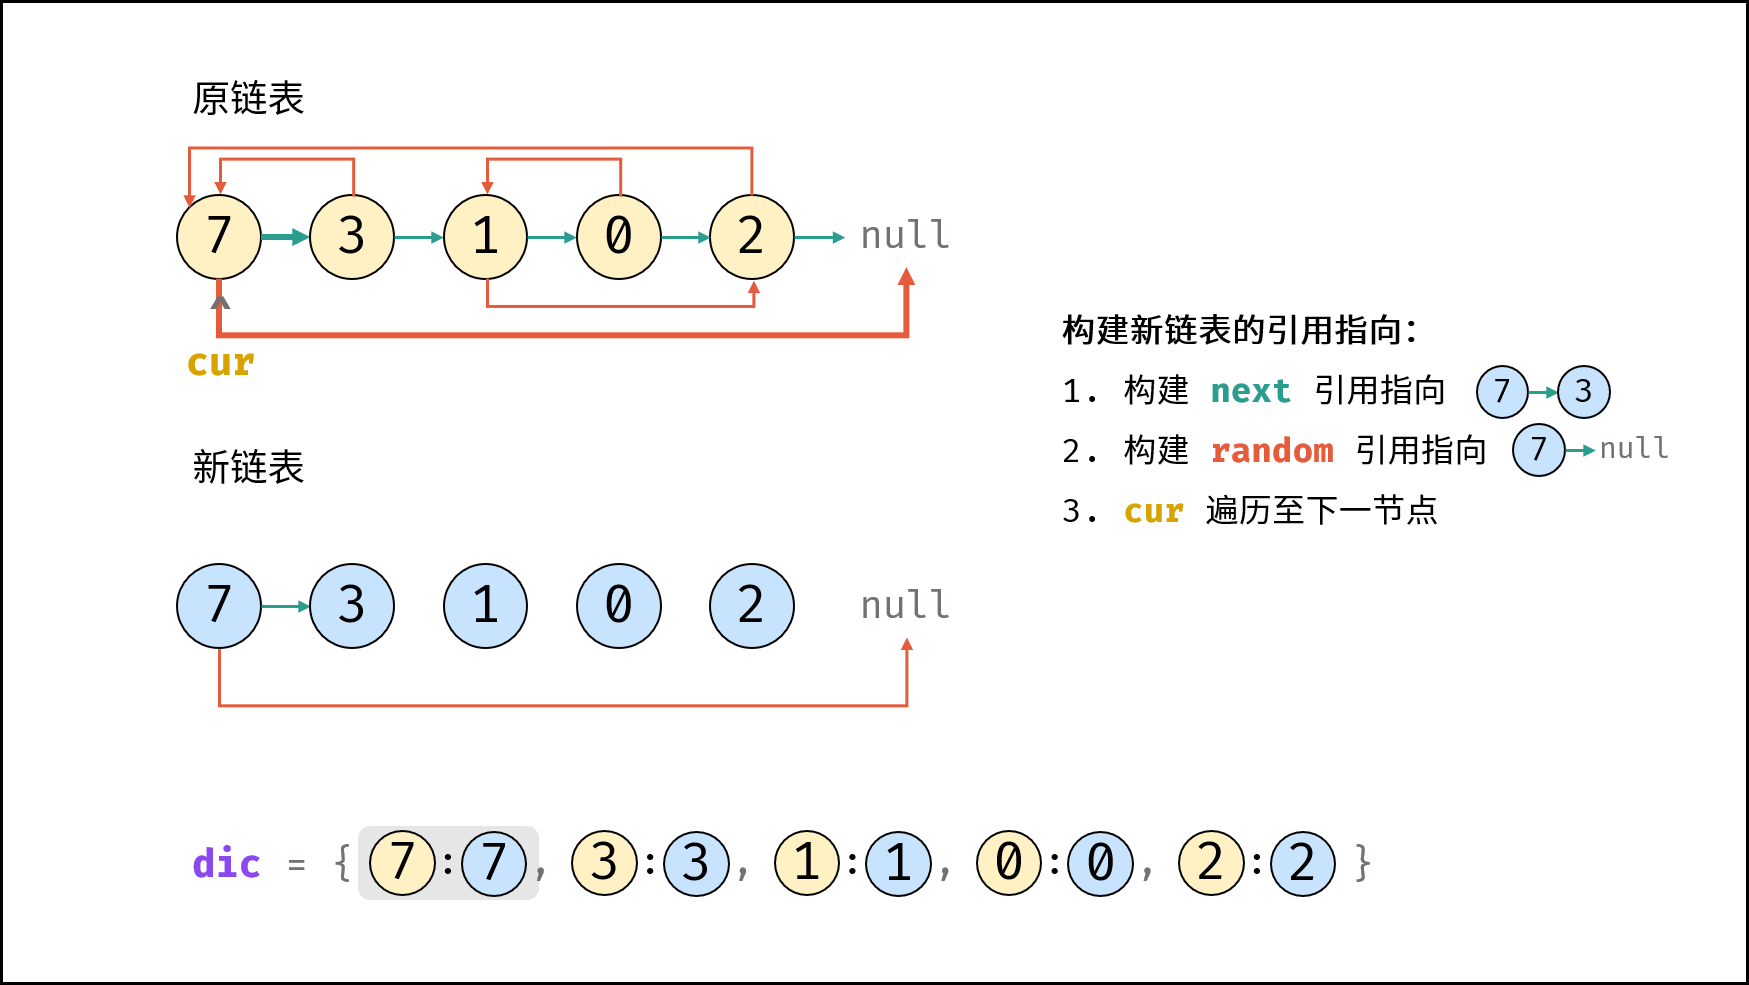
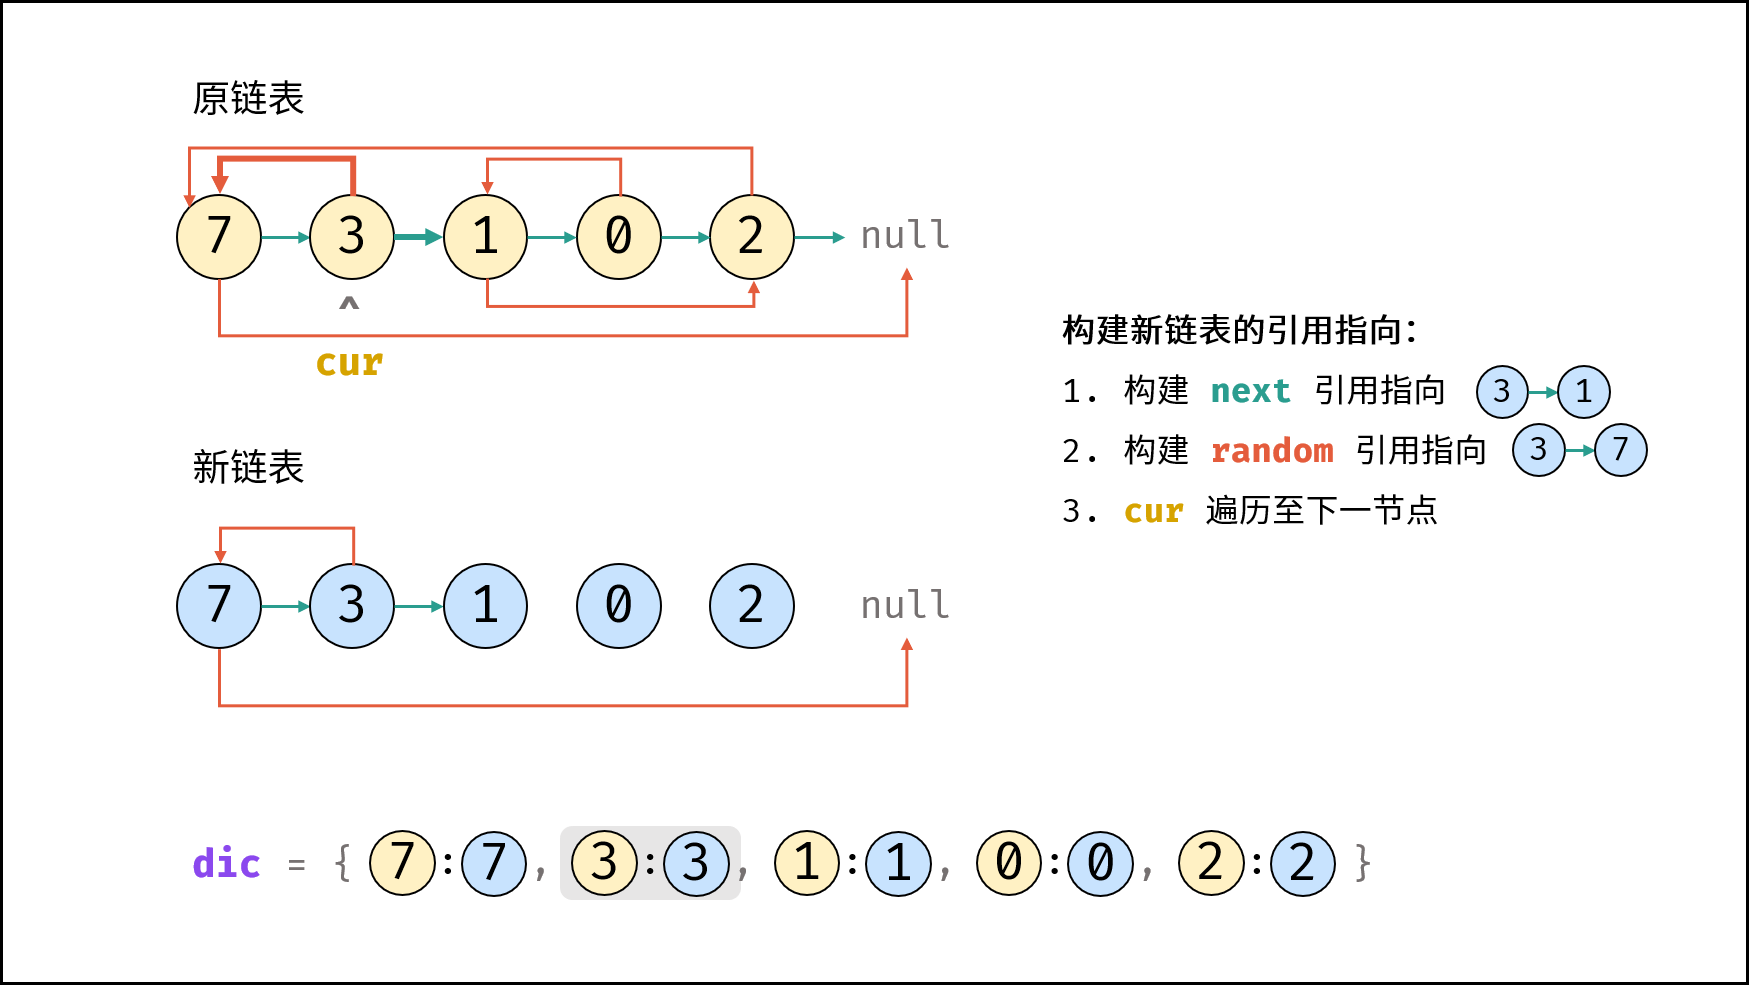
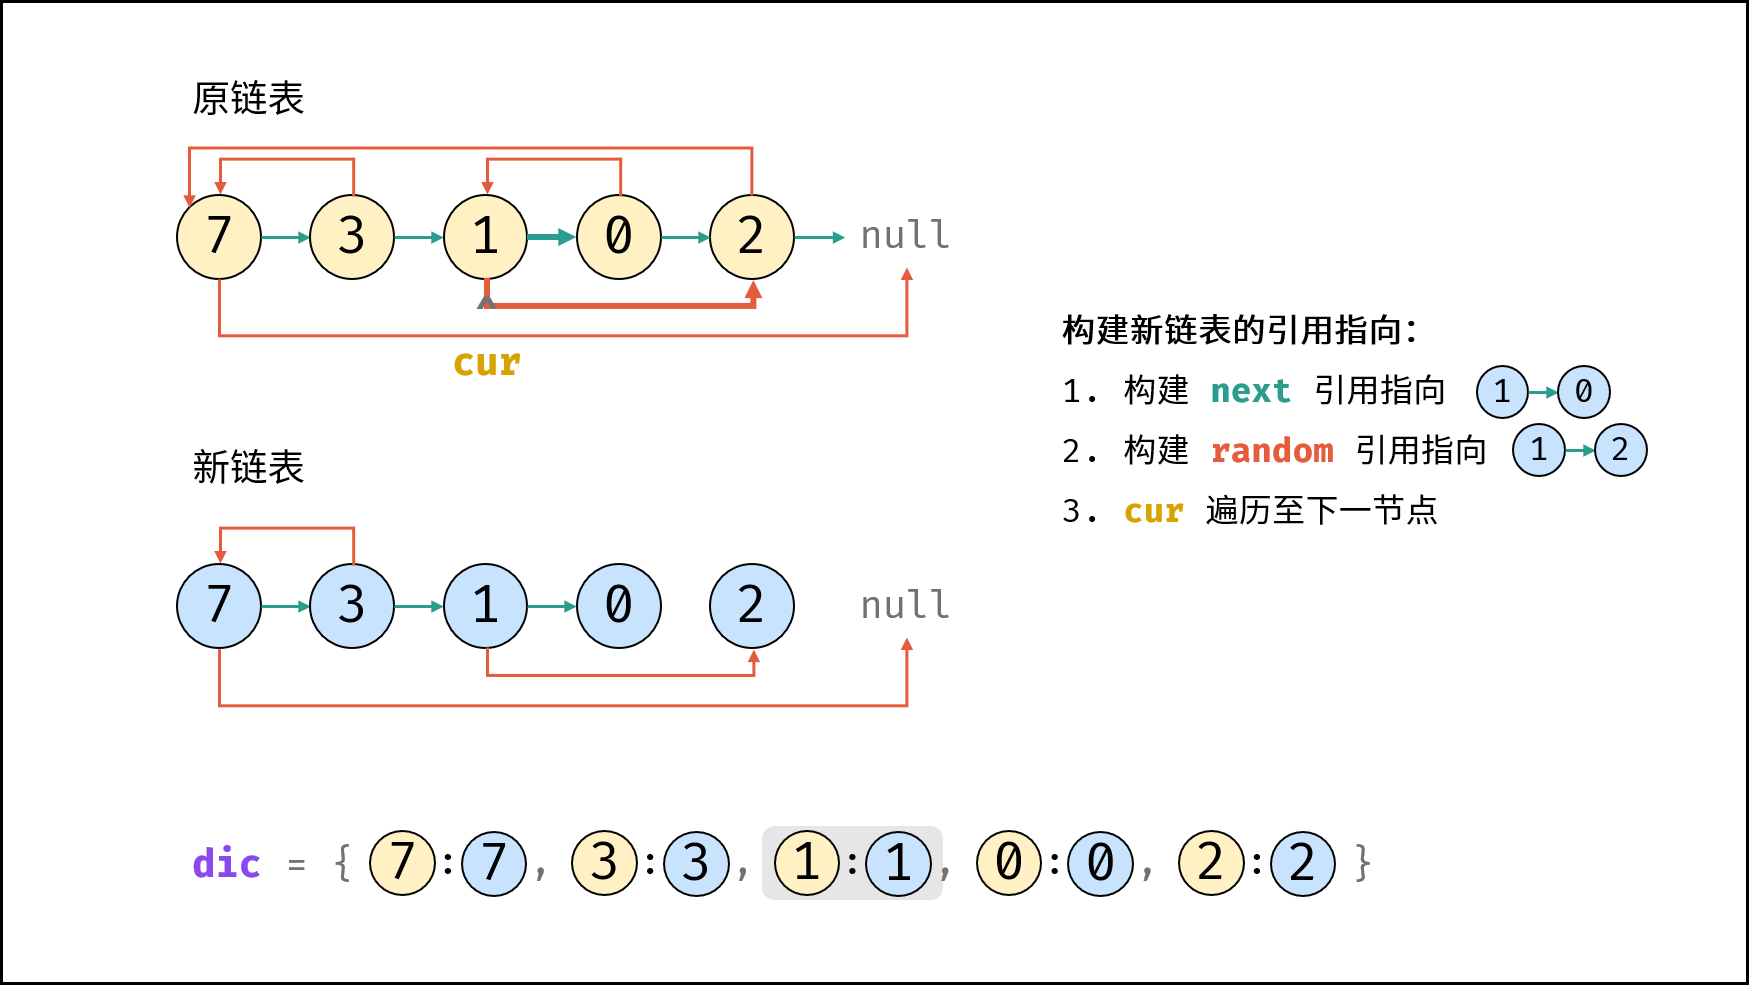
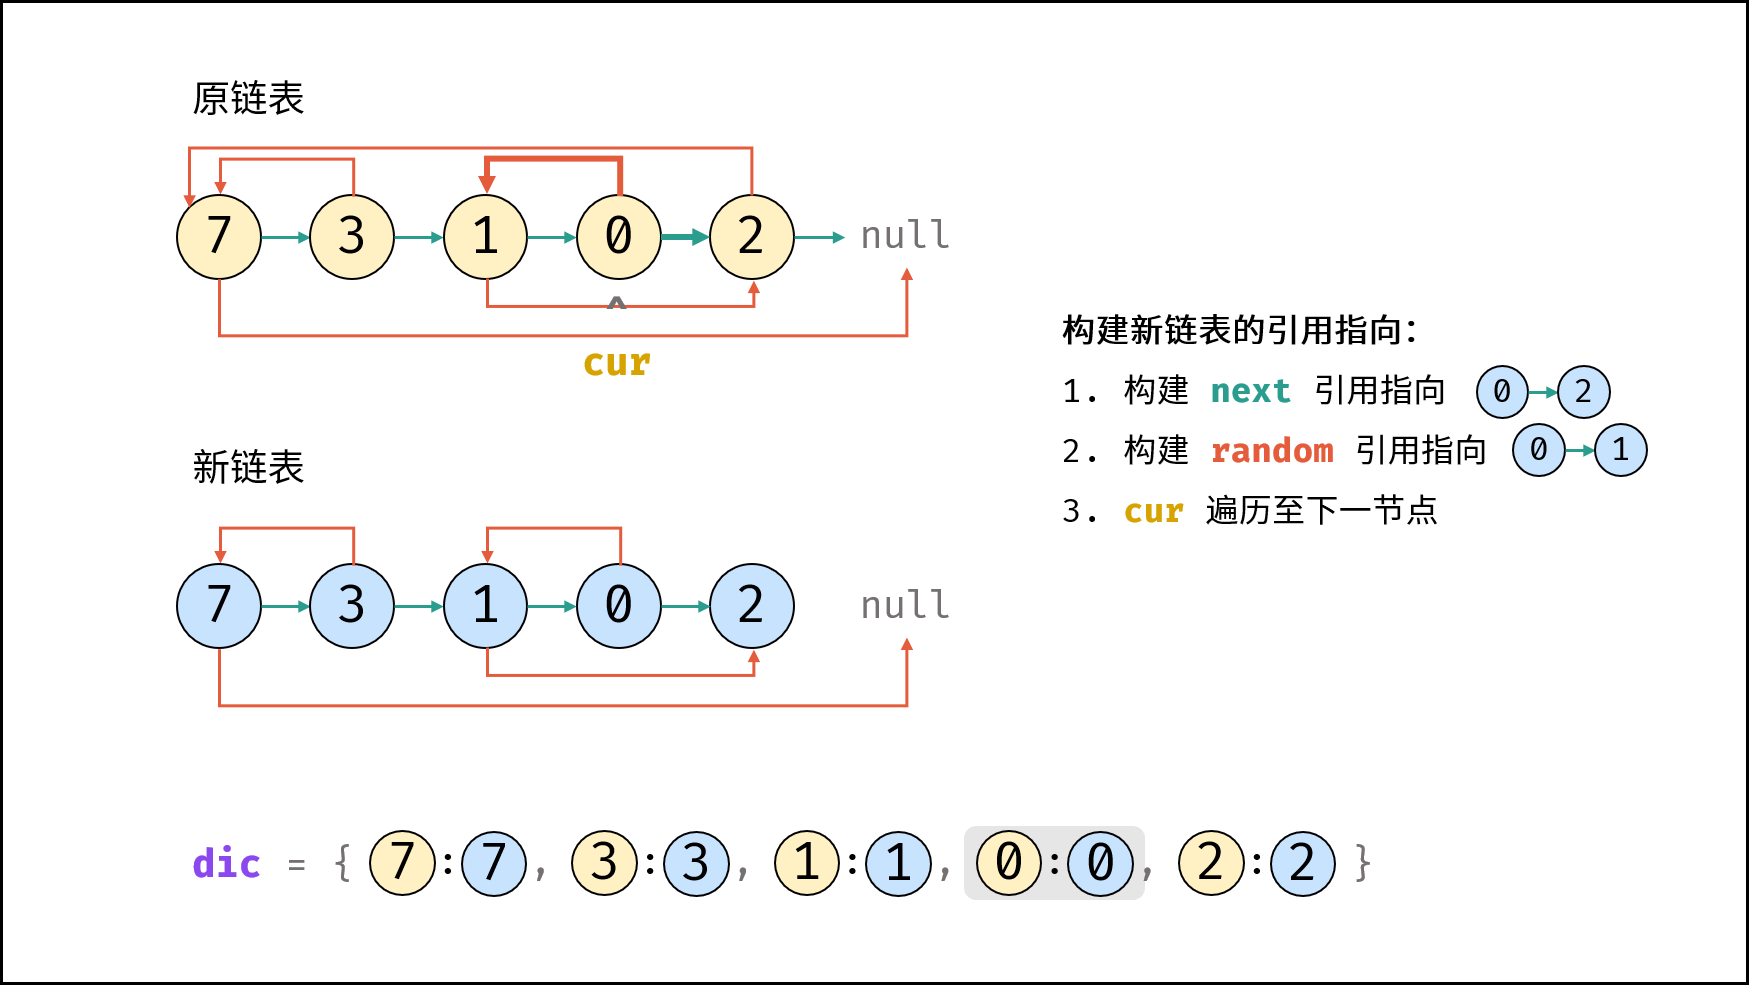
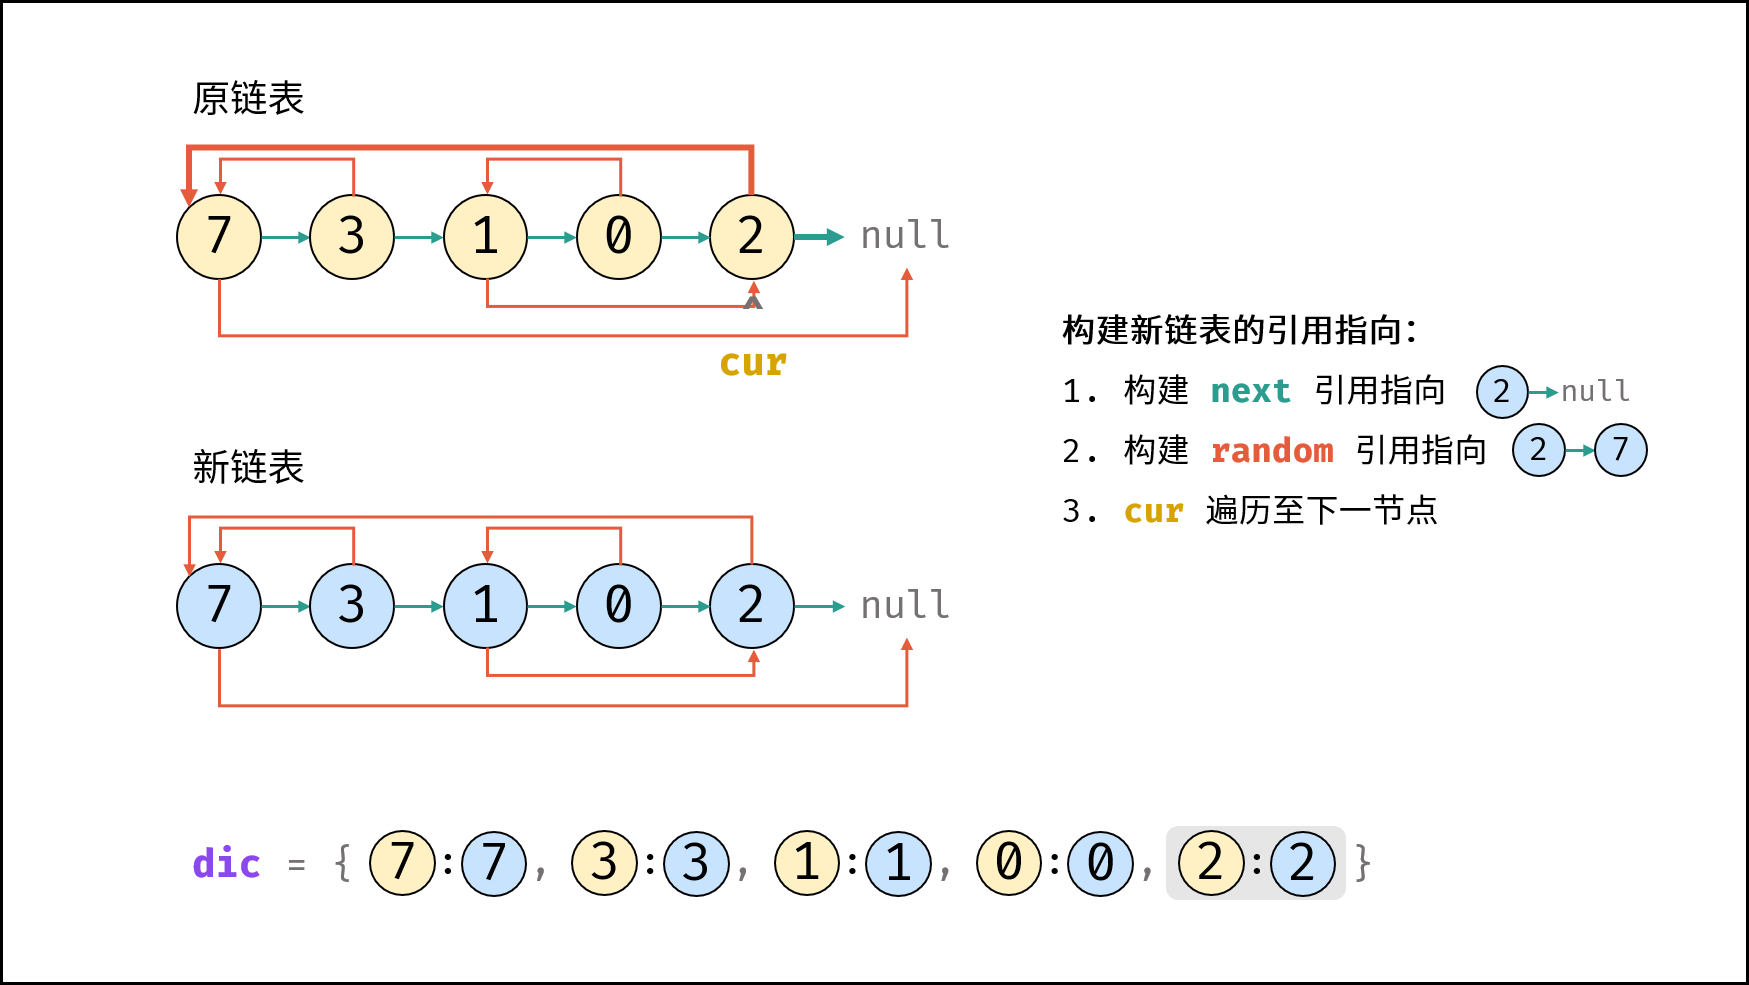
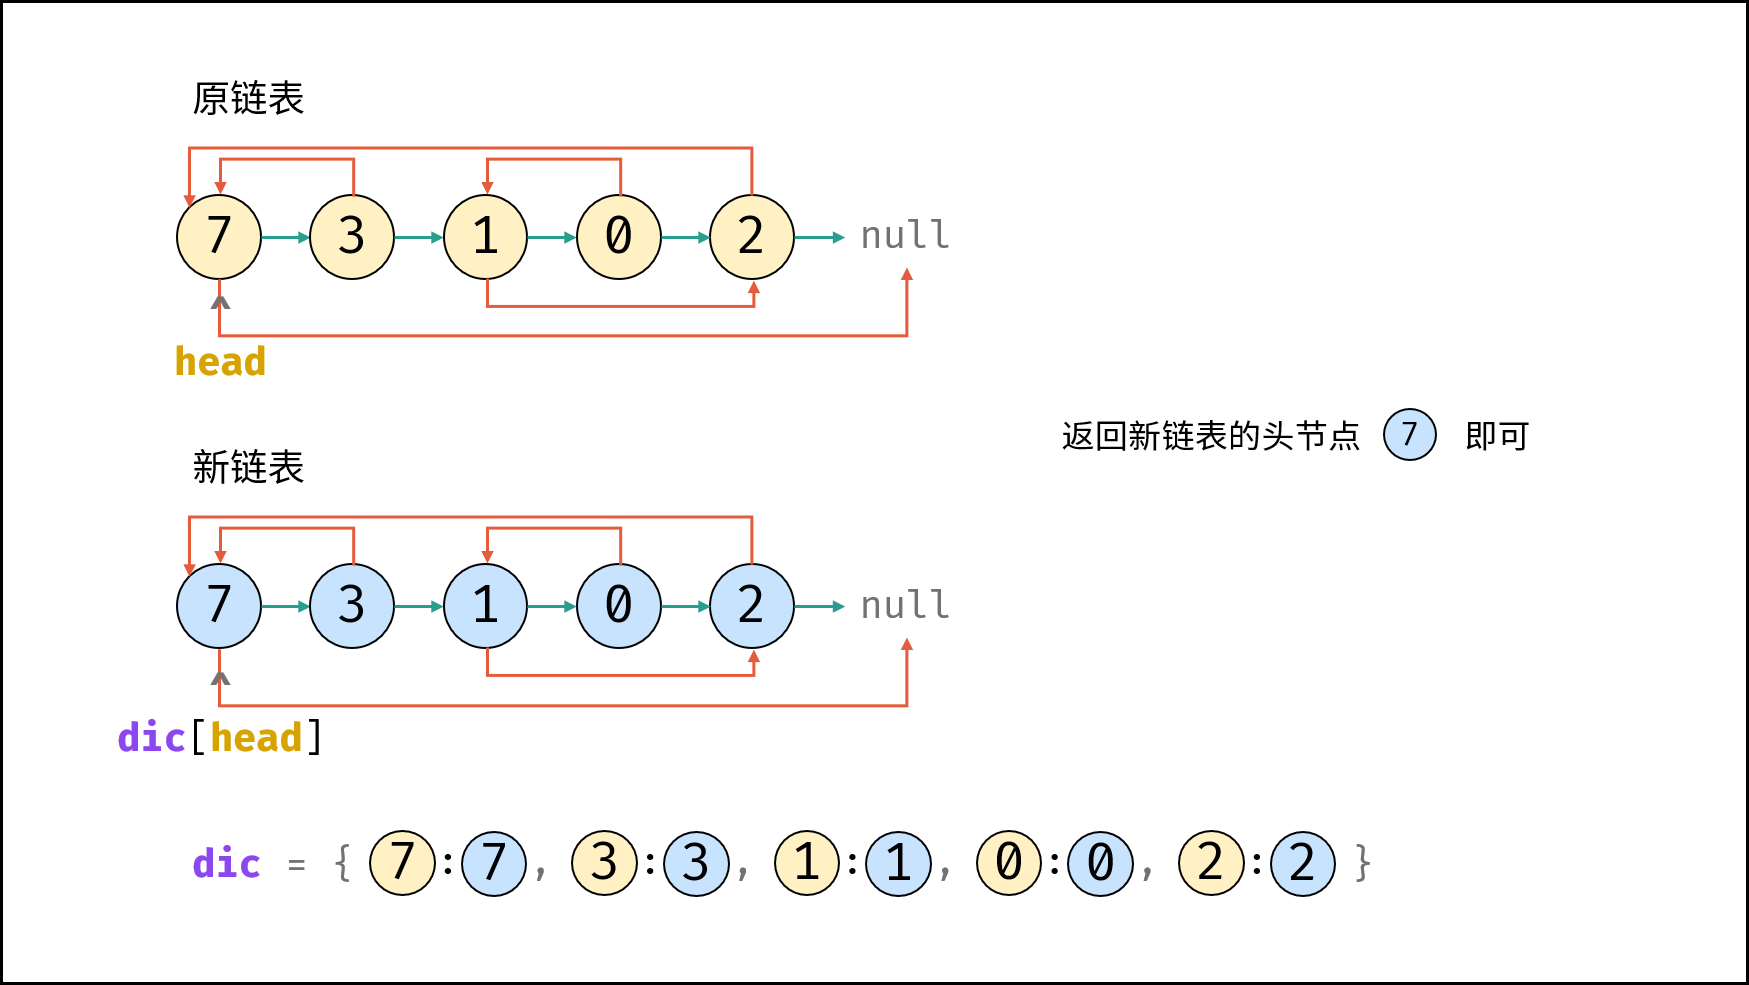
利用哈希表的查询特点,考虑构建 原链表节点 和 新链表对应节点 的键值对映射关系,再遍历构建新链表各节点的 next 和 random 引用指向即可。
算法流程:
- 若头节点
head为空节点,直接返回 $null$ ; - 初始化: 哈希表
dic, 节点cur指向头节点; - 复制链表:
- 建立新节点,并向
dic添加键值对(原 cur 节点, 新 cur 节点); cur遍历至原链表下一节点;
- 建立新节点,并向
- 构建新链表的引用指向:
- 构建新节点的
next和random引用指向; cur遍历至原链表下一节点;
- 构建新节点的
- 返回值: 新链表的头节点
dic[cur];
复杂度分析:
- 时间复杂度 $O(N)$ : 两轮遍历链表,使用 $O(N)$ 时间。
- 空间复杂度 $O(N)$ : 哈希表
dic使用线性大小的额外空间。
< ,
, ,
, ,
, ,
, ,
, ,
, ,
, ,
, ,
, ,
, ,
, >
>
代码:
Python
class Solution:
    def copyRandomList(self, head: 'Node') -> 'Node':
        if not head: return
        dic = {}
        # 3. 复制各节点,并建立 “原节点 -> 新节点” 的 Map 映射
        cur = head
        while cur:
            dic[cur] = Node(cur.val)
            cur = cur.next
        cur = head
        # 4. 构建新节点的 next 和 random 指向
        while cur:
            dic[cur].next = dic.get(cur.next)
            dic[cur].random = dic.get(cur.random)
            cur = cur.next
        # 5. 返回新链表的头节点
        return dic[head]
Java
class Solution {
    public Node copyRandomList(Node head) {
        if(head == null) return null;
        Node cur = head;
        Map<Node, Node> map = new HashMap<>();
        // 3. 复制各节点,并建立 “原节点 -> 新节点” 的 Map 映射
        while(cur != null) {
            map.put(cur, new Node(cur.val));
            cur = cur.next;
        }
        cur = head;
        // 4. 构建新链表的 next 和 random 指向
        while(cur != null) {
            map.get(cur).next = map.get(cur.next);
            map.get(cur).random = map.get(cur.random);
            cur = cur.next;
        }
        // 5. 返回新链表的头节点
        return map.get(head);
    }
}
C++
class Solution {
public:
    Node* copyRandomList(Node* head) {
        if(head == nullptr) return nullptr;
        Node* cur = head;
        unordered_map<Node*, Node*> map;
        // 3. 复制各节点,并建立 “原节点 -> 新节点” 的 Map 映射
        while(cur != nullptr) {
            map[cur] = new Node(cur->val);
            cur = cur->next;
        }
        cur = head;
        // 4. 构建新链表的 next 和 random 指向
        while(cur != nullptr) {
            map[cur]->next = map[cur->next];
            map[cur]->random = map[cur->random];
            cur = cur->next;
        }
        // 5. 返回新链表的头节点
        return map[head];
    }
};
方法二:拼接 + 拆分
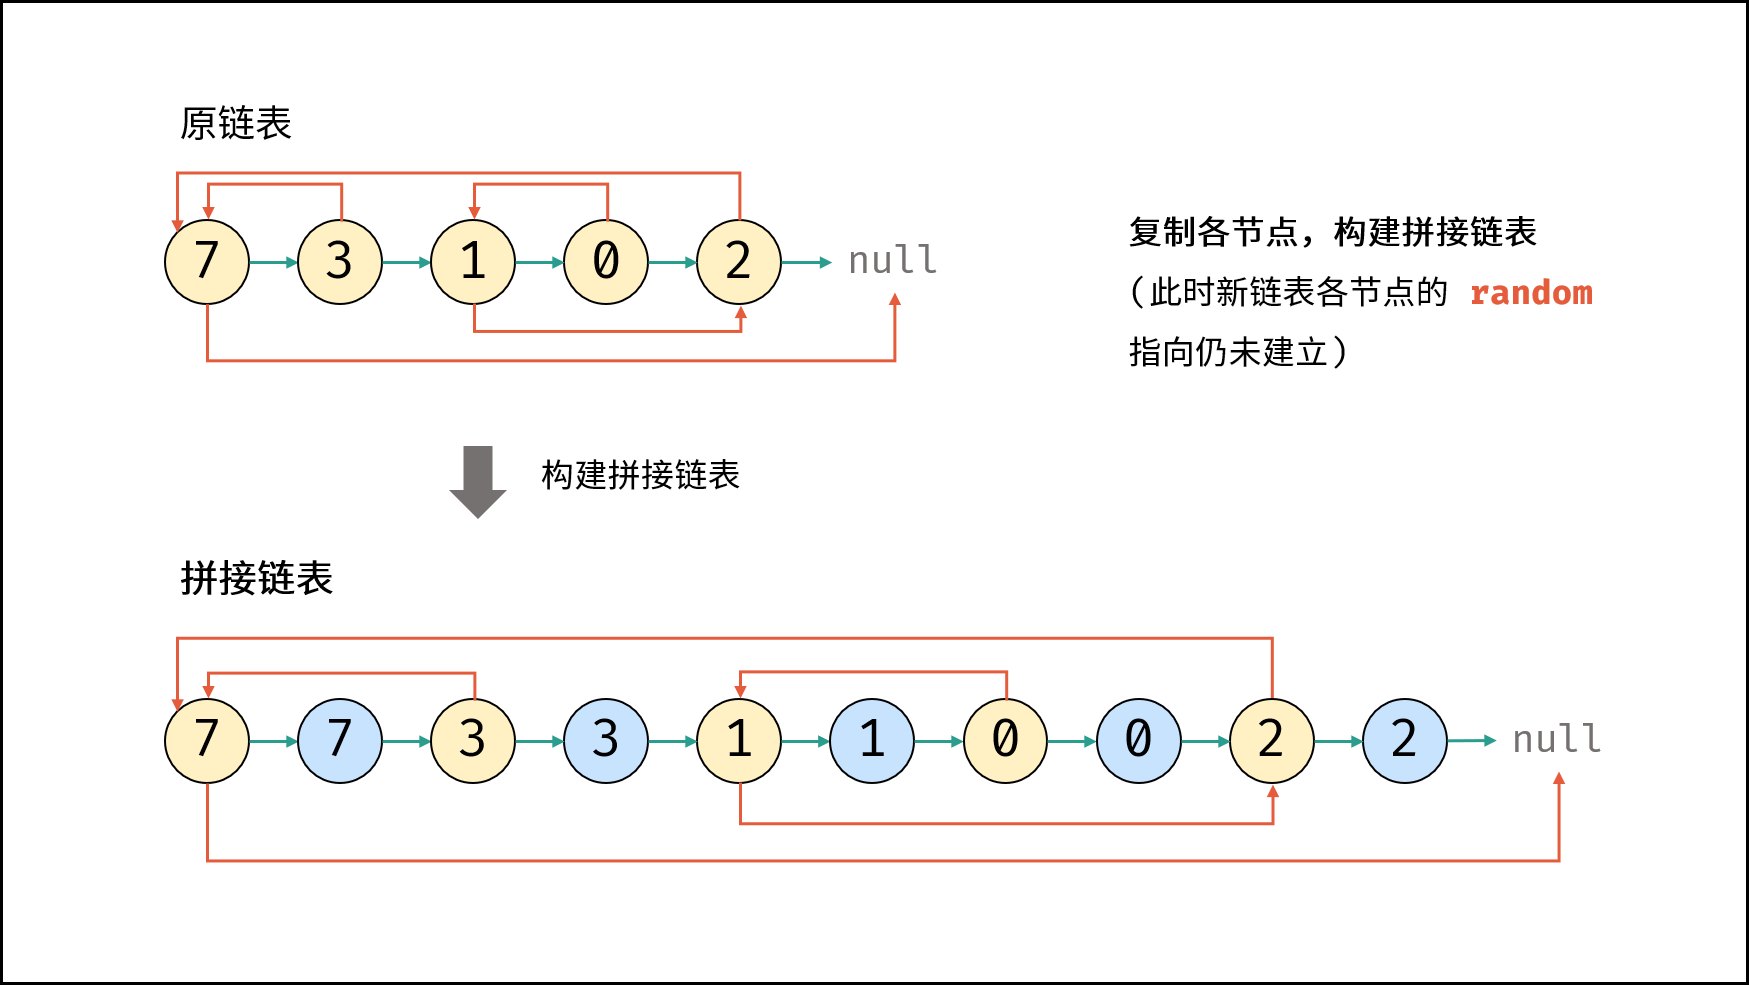
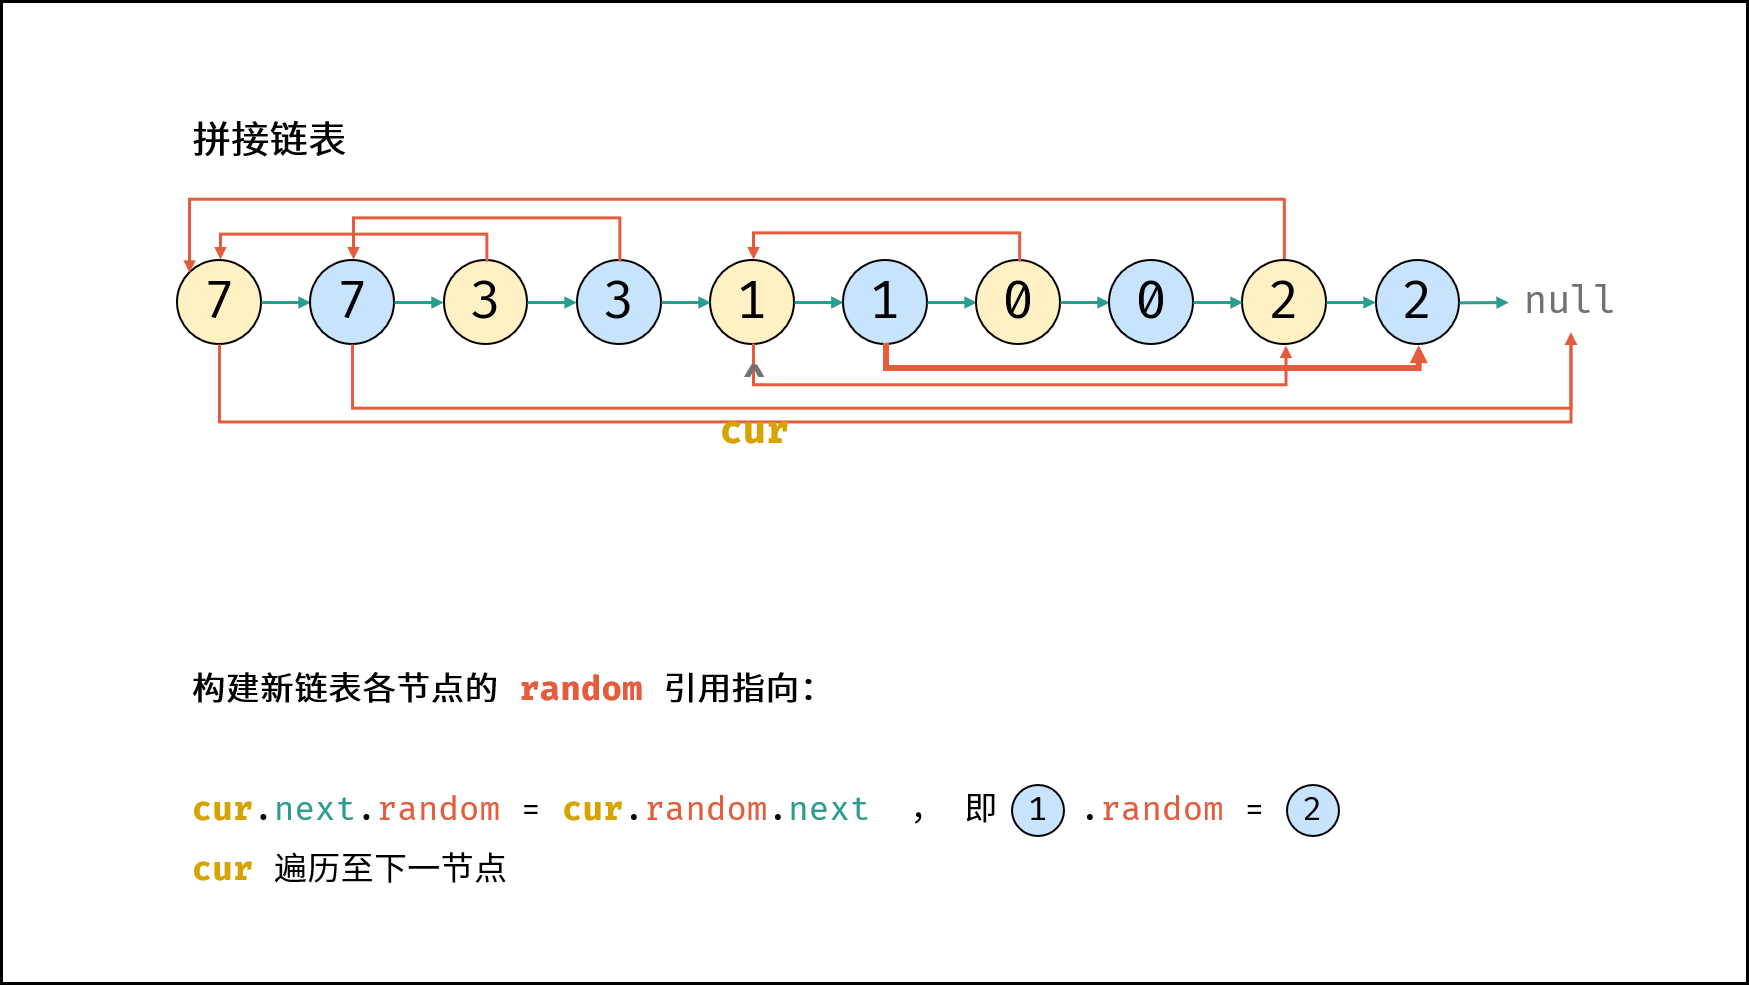
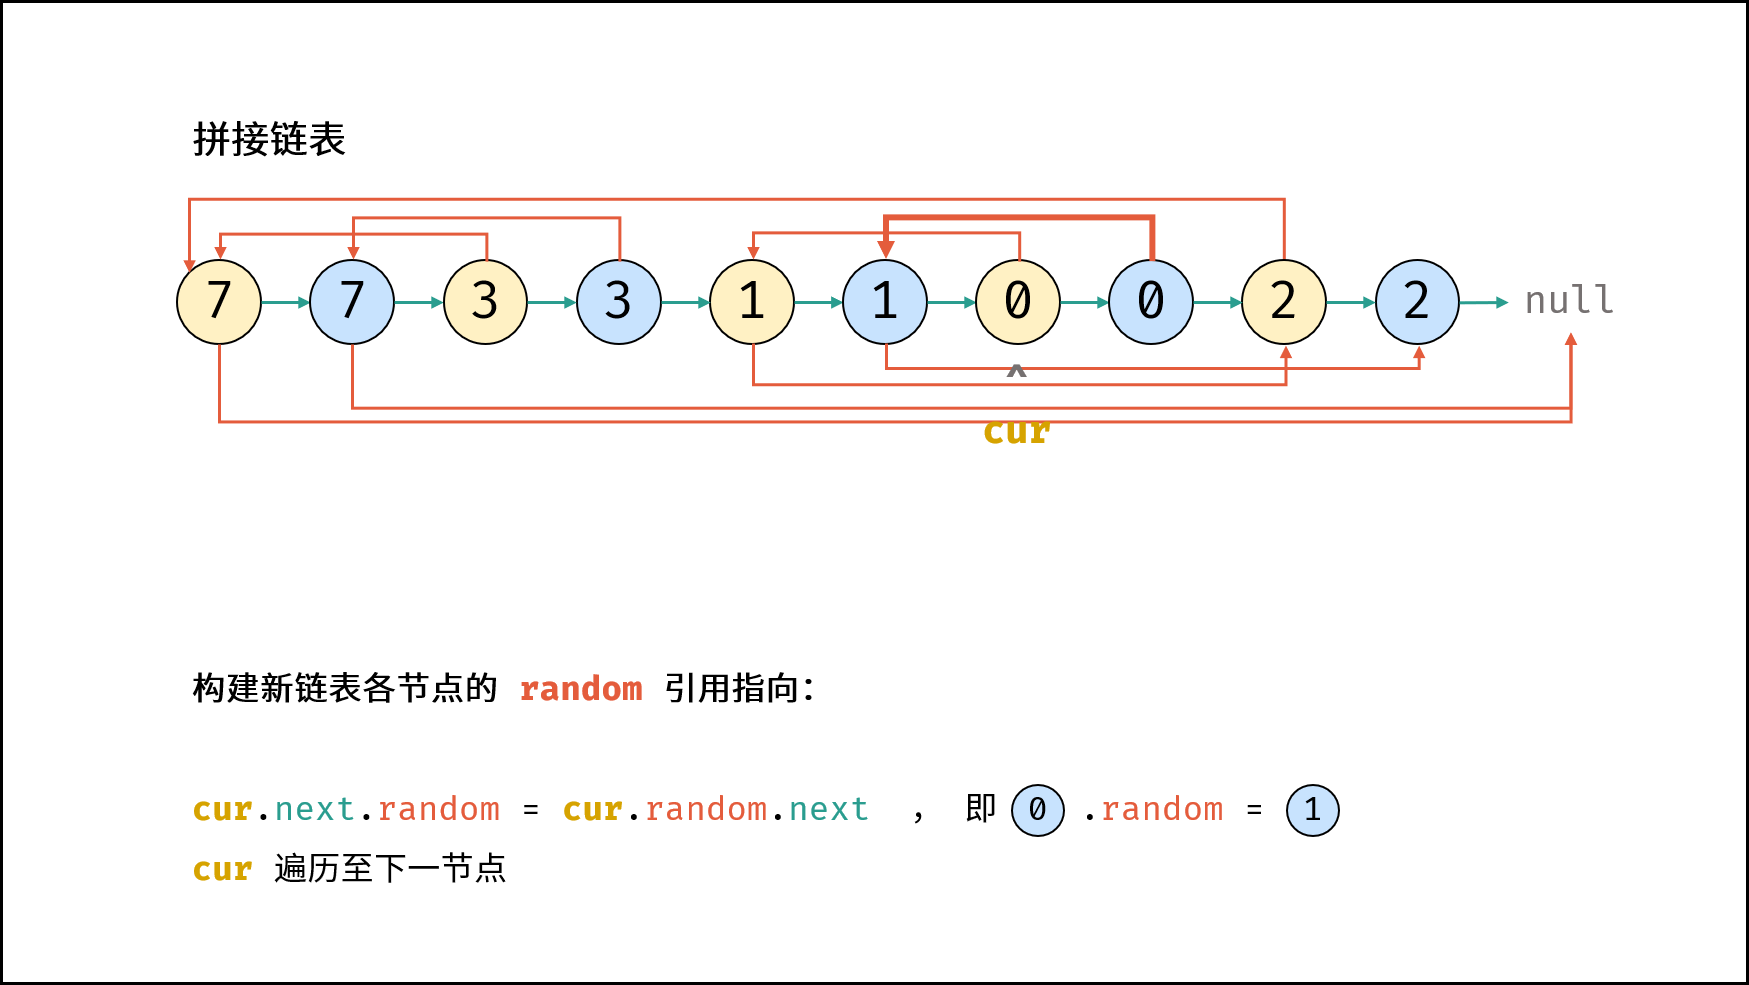
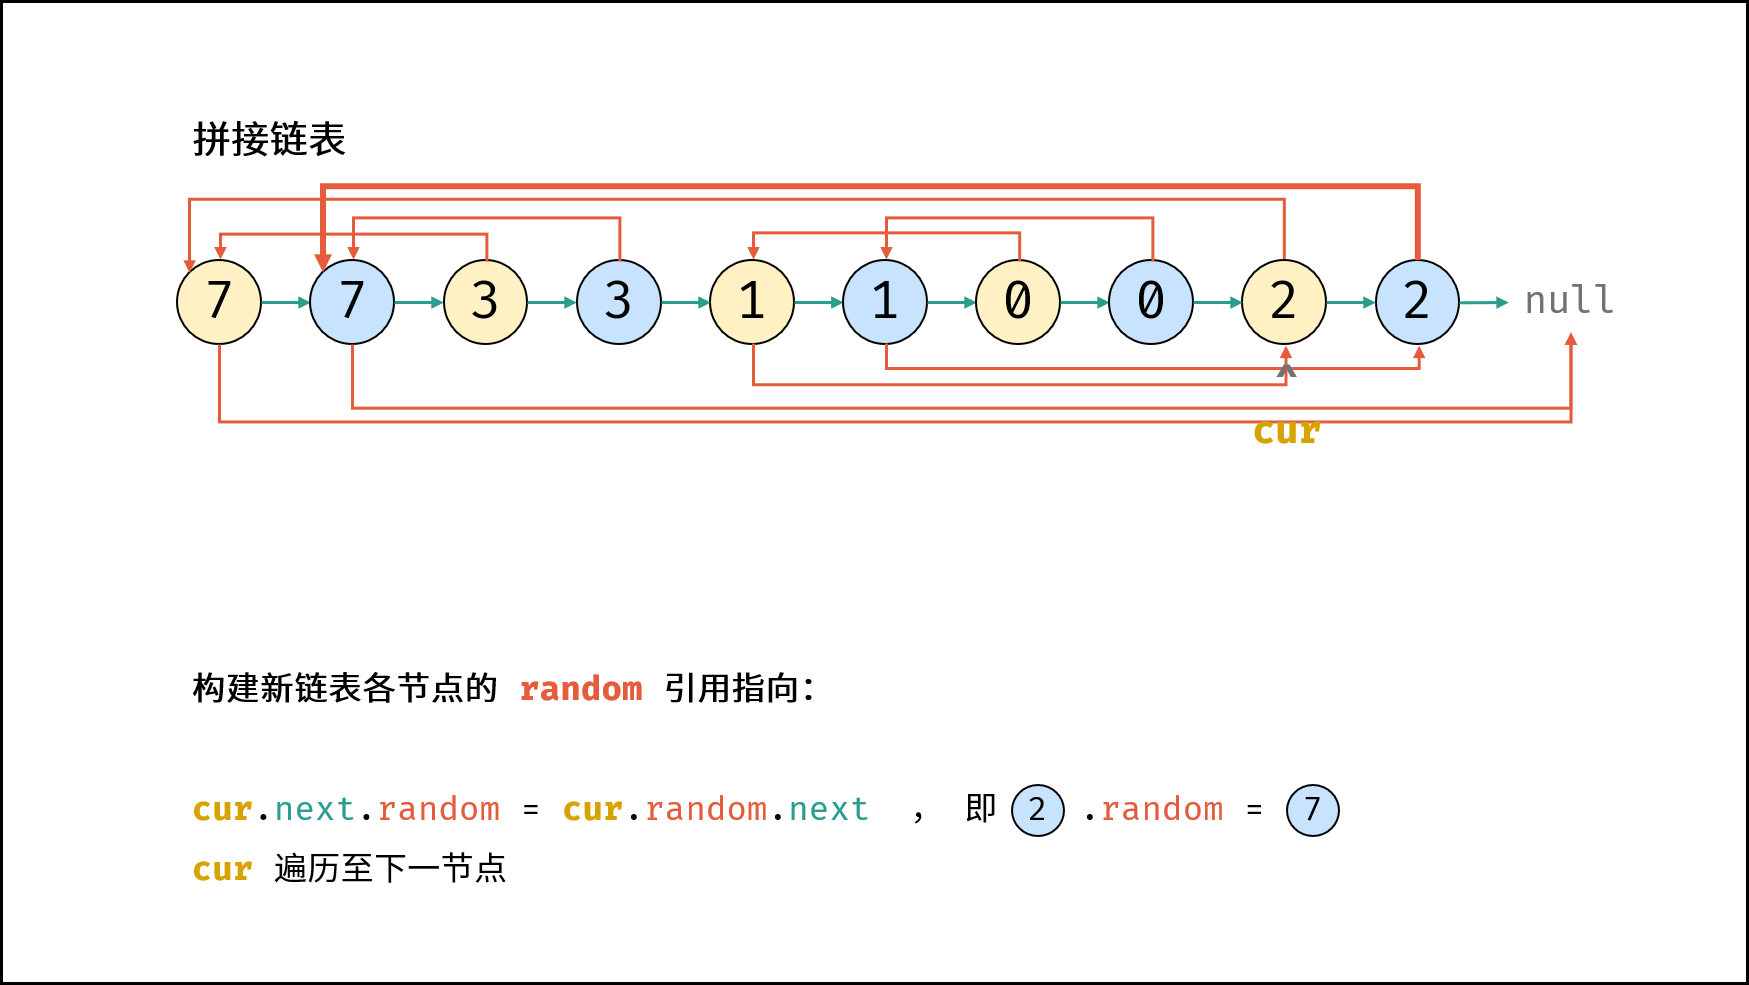
考虑构建 原节点 1 -> 新节点 1 -> 原节点 2 -> 新节点 2 -> …… 的拼接链表,如此便可在访问原节点的 random 指向节点的同时找到新对应新节点的 random 指向节点。
算法流程:
复制各节点,构建拼接链表:
- 设原链表为 $node1 \rightarrow node2 \rightarrow \cdots$ ,构建的拼接链表如下所示:
$$ node1 \rightarrow node1_{new} \rightarrow node2 \rightarrow node2_{new} \rightarrow \cdots $$
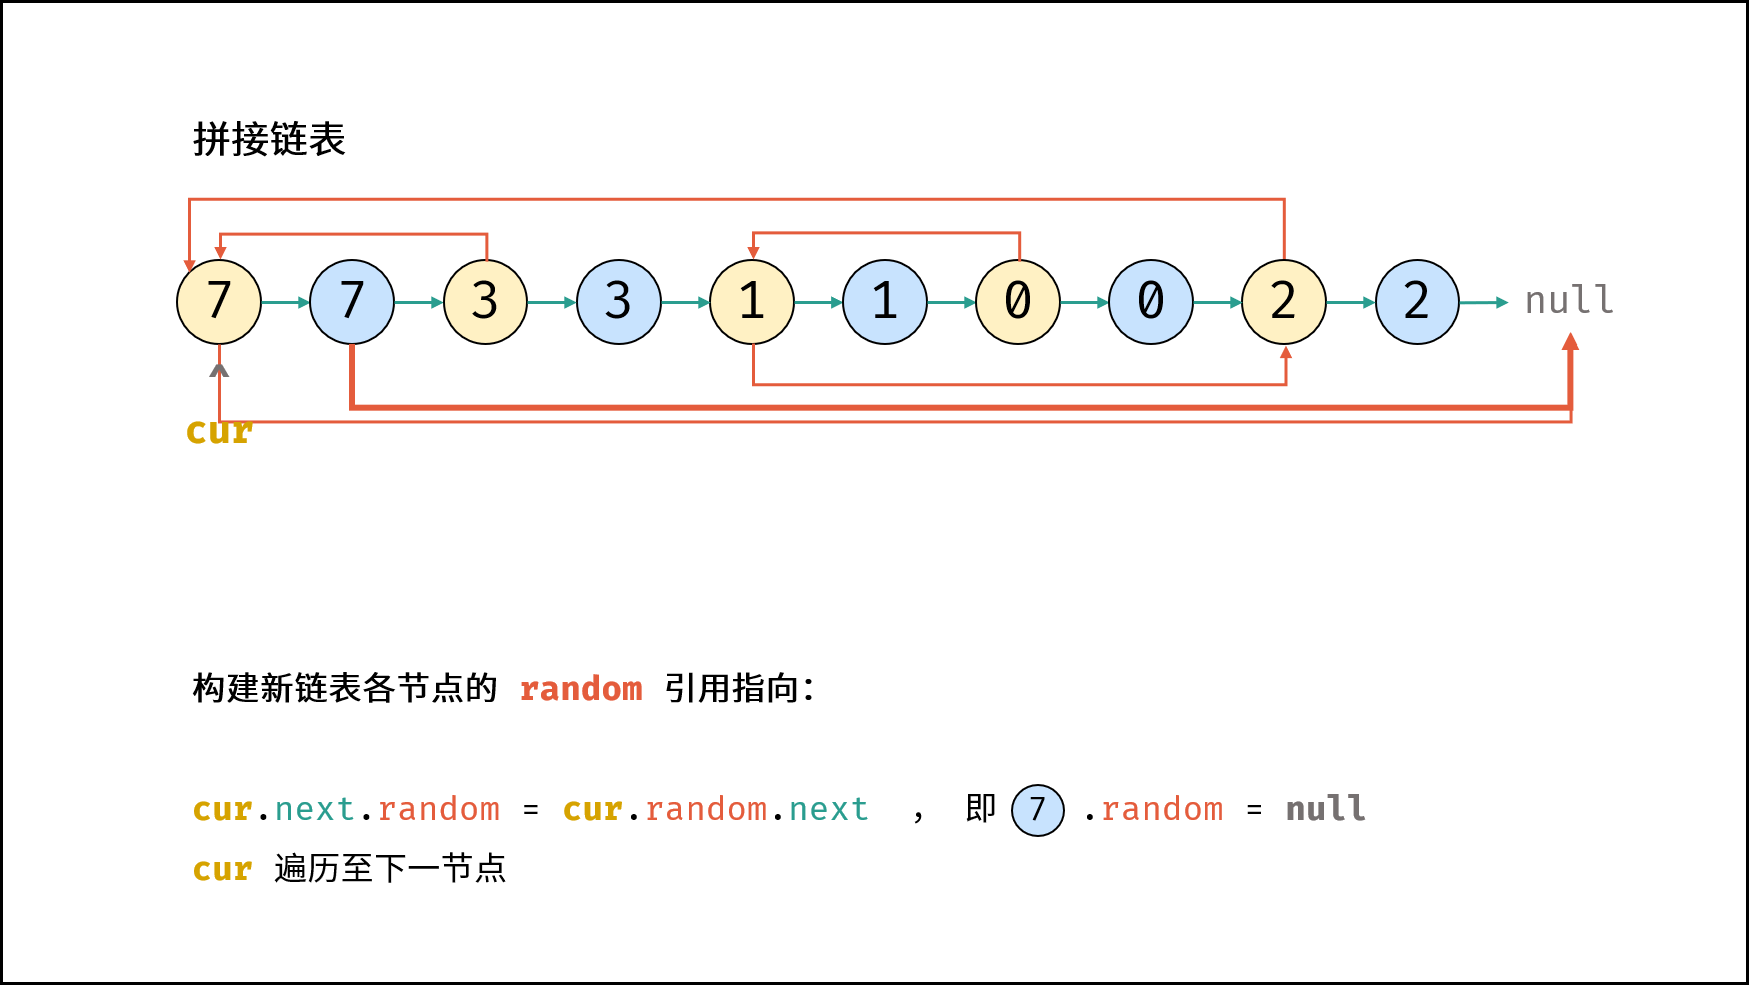
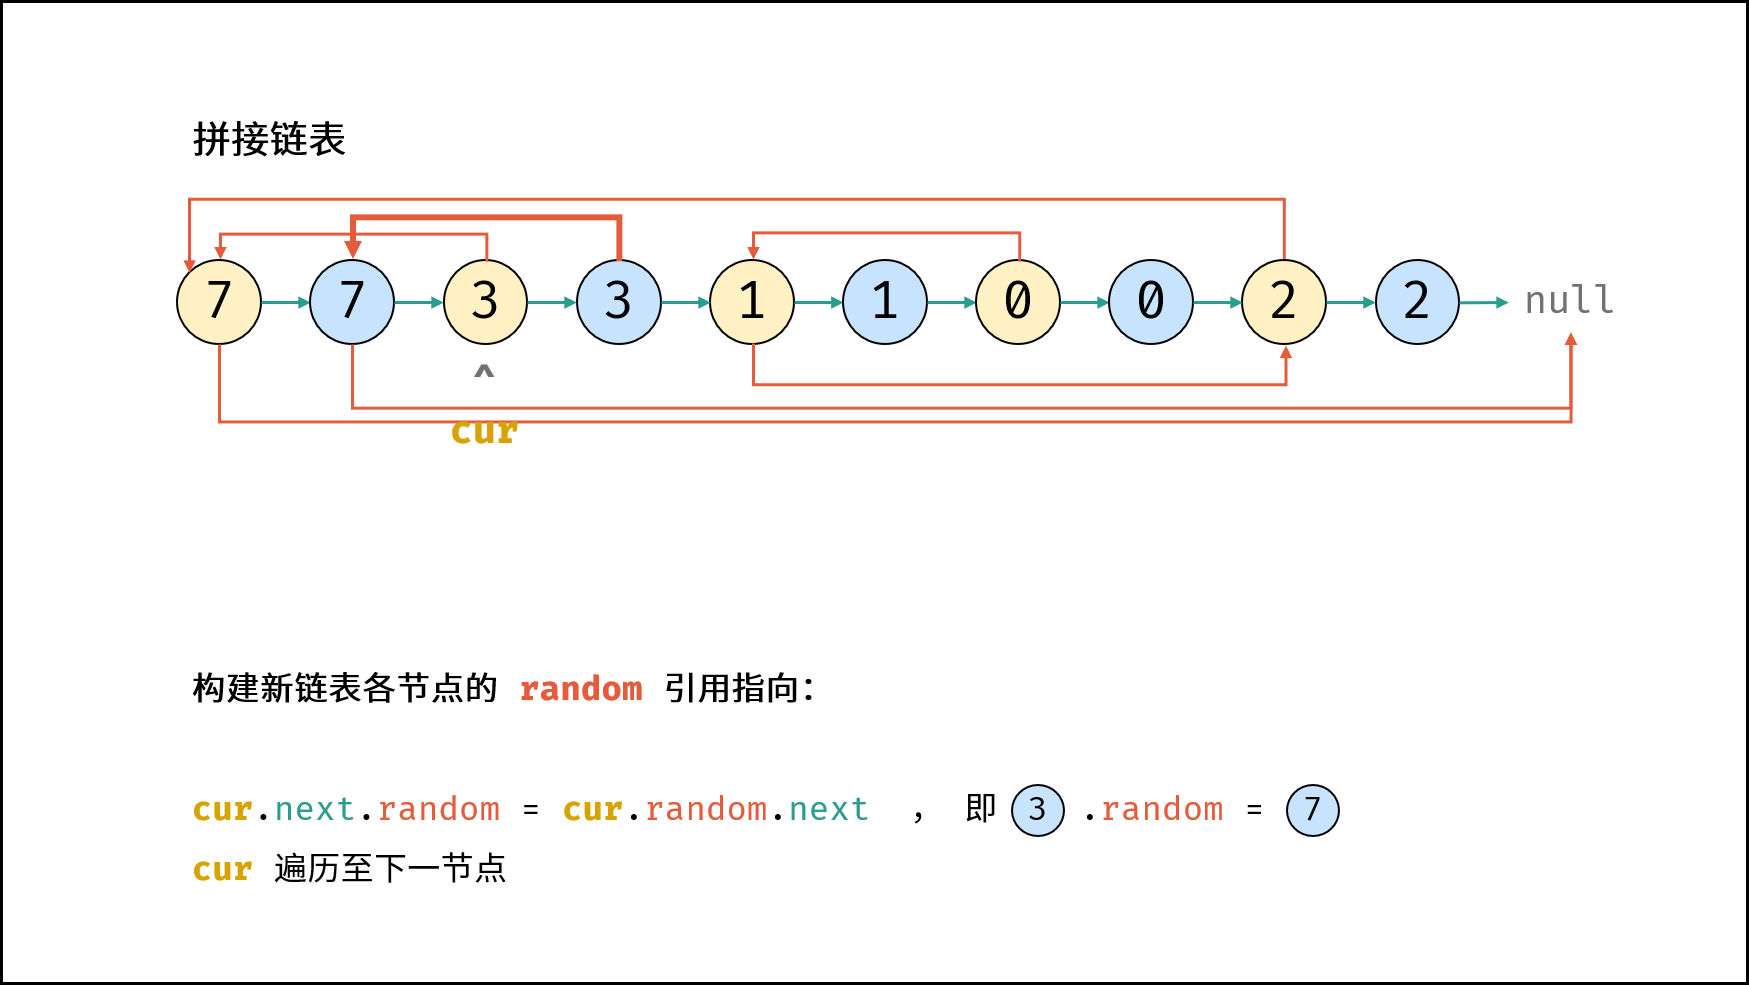
构建新链表各节点的
random指向:- 当访问原节点
cur的随机指向节点cur.random时,对应新节点cur.next的随机指向节点为cur.random.next。
- 当访问原节点
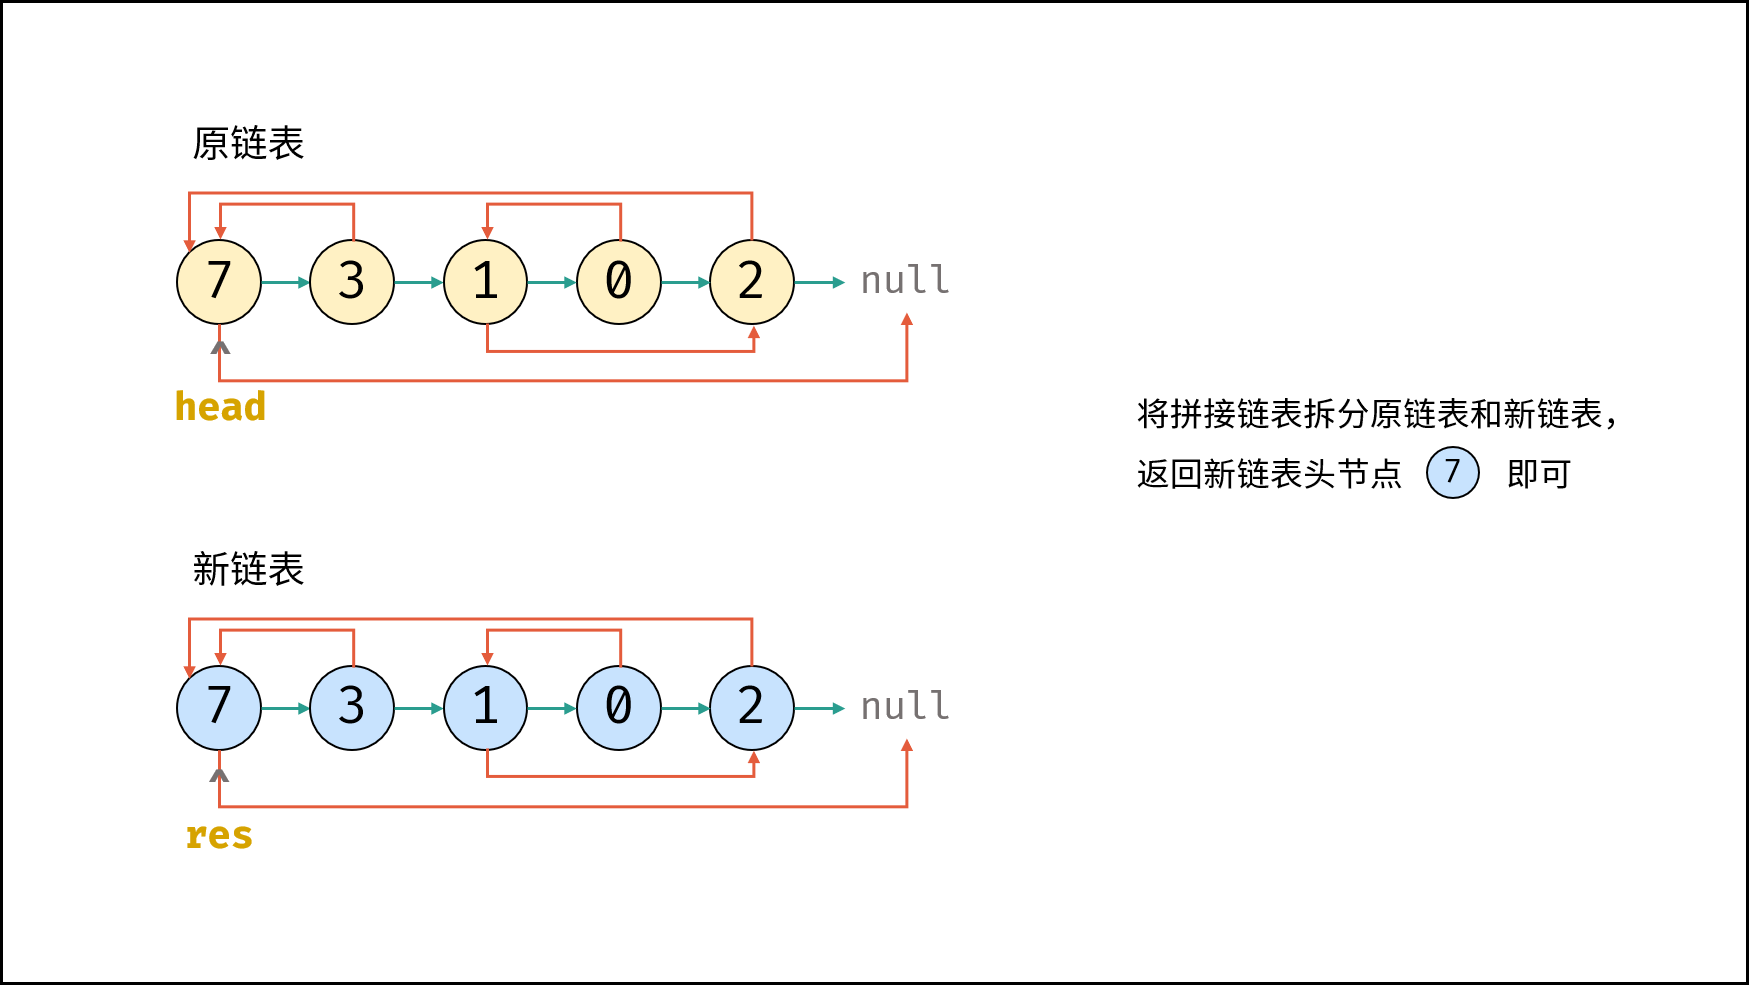
拆分原 / 新链表:
- 设置
pre/cur分别指向原 / 新链表头节点,遍历执行pre.next = pre.next.next和cur.next = cur.next.next将两链表拆分开。
- 设置
返回新链表的头节点
res即可。
复杂度分析:
- 时间复杂度 $O(N)$ : 三轮遍历链表,使用 $O(N)$ 时间。
- 空间复杂度 $O(1)$ : 节点引用变量使用常数大小的额外空间。
< ,
, ,
, ,
, ,
, ,
, ,
, >
>
代码:
Python
class Solution:
    def copyRandomList(self, head: 'Node') -> 'Node':
        if not head: return
        cur = head
        # 1. 复制各节点,并构建拼接链表
        while cur:
            tmp = Node(cur.val)
            tmp.next = cur.next
            cur.next = tmp
            cur = tmp.next
        # 2. 构建各新节点的 random 指向
        cur = head
        while cur:
            if cur.random:
                cur.next.random = cur.random.next
            cur = cur.next.next
        # 3. 拆分两链表
        cur = res = head.next
        pre = head
        while cur.next:
            pre.next = pre.next.next
            cur.next = cur.next.next
            pre = pre.next
            cur = cur.next
        pre.next = None # 单独处理原链表尾节点
        return res      # 返回新链表头节点
Java
class Solution {
    public Node copyRandomList(Node head) {
        if(head == null) return null;
        Node cur = head;
        // 1. 复制各节点,并构建拼接链表
        while(cur != null) {
            Node tmp = new Node(cur.val);
            tmp.next = cur.next;
            cur.next = tmp;
            cur = tmp.next;
        }
        // 2. 构建各新节点的 random 指向
        cur = head;
        while(cur != null) {
            if(cur.random != null)
                cur.next.random = cur.random.next;
            cur = cur.next.next;
        }
        // 3. 拆分两链表
        cur = head.next;
        Node pre = head, res = head.next;
        while(cur.next != null) {
            pre.next = pre.next.next;
            cur.next = cur.next.next;
            pre = pre.next;
            cur = cur.next;
        }
        pre.next = null; // 单独处理原链表尾节点
        return res;      // 返回新链表头节点
    }
}
C++
class Solution {
public:
    Node* copyRandomList(Node* head) {
        if(head == nullptr) return nullptr;
        Node* cur = head;
        // 1. 复制各节点,并构建拼接链表
        while(cur != nullptr) {
            Node* tmp = new Node(cur->val);
            tmp->next = cur->next;
            cur->next = tmp;
            cur = tmp->next;
        }
        // 2. 构建各新节点的 random 指向
        cur = head;
        while(cur != nullptr) {
            if(cur->random != nullptr)
                cur->next->random = cur->random->next;
            cur = cur->next->next;
        }
        // 3. 拆分两链表
        cur = head->next;
        Node* pre = head, *res = head->next;
        while(cur->next != nullptr) {
            pre->next = pre->next->next;
            cur->next = cur->next->next;
            pre = pre->next;
            cur = cur->next;
        }
        pre->next = nullptr; // 单独处理原链表尾节点
        return res;      // 返回新链表头节点
    }
};