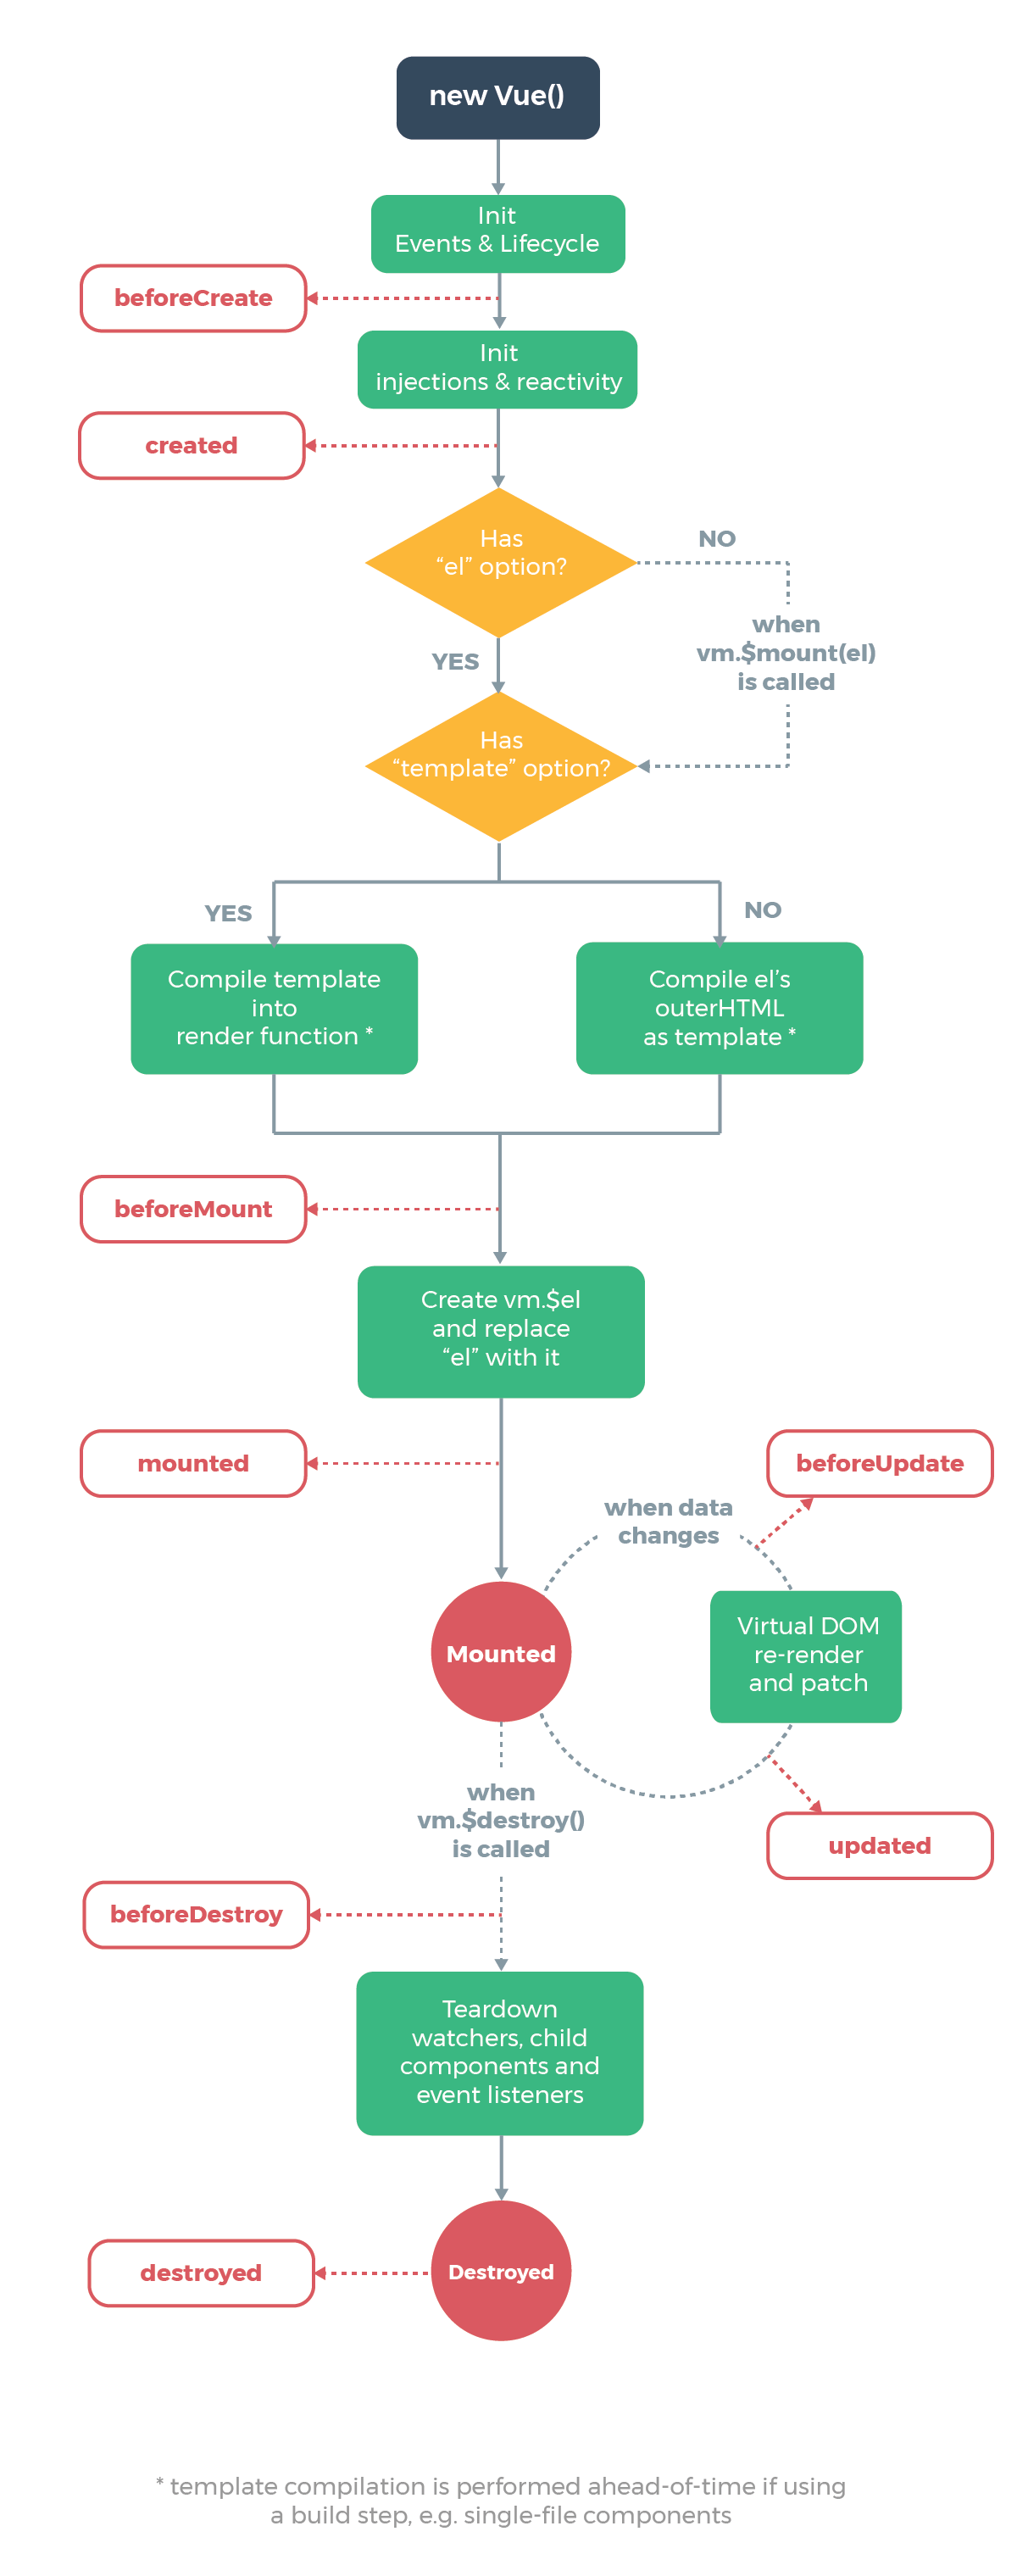
生命周期
Vue实例有一个完整的生命周期,也就是从开始创建、初始化数据、编译模板、挂载 Dom、渲染 → 更新 → 渲染、销毁等一系列过程,我们称这是 Vue 的生命周期。通俗说就是 Vue 实例从创建到销毁的过程,就是生命周期。
每个Vue实例在被创建之前都要经过一系列的初始化过程。例如需要设置数据监听、编译模板、挂载实例到 DOM、在数据变化时更新 DOM 等。同时在这个过程中也会运行一些叫做生命周期钩子的函数,给予用户机会在一些特定的场景下添加他们自己的代码。

在实际项目开发过程中,会非常频繁地和Vue组件的生命周期打交道,接下来将从源码的角度来看一下这些生命周期的钩子函数是如何被执行的。
TIP
源码中最终执行生命周期的函数都是调用callHook方法
export function callHook(vm: Component, hook: string, args?: any[], setContext = true) {
  pushTarget()
  const prev = currentInstance
  setContext && setCurrentInstance(vm)
  const handlers = vm.$options[hook]
  const info = `${hook} hook`
  if (handlers) {
    for (let i = 0, j = handlers.length; i < j; i++) {
      invokeWithErrorHandling(handlers[i], vm, args || null, vm, info)
    }
  }
  if (vm._hasHookEvent) {
    vm.$emit('hook:' + hook)
  }
  setContext && setCurrentInstance(prev)
  popTarget()
}callHook函数的逻辑很简单,根据传入的字符串hook,去拿到vm.$options[hook]对应的回调函数数组,然后遍历执行,执行的时候把vm作为函数执行的上下文
beforeCreate和created
beforeCreate和created函数都是在实例化Vue的阶段,在_init方法中执行的, 也就是初始化实例的时候
Vue.prototype._init = function (options?: Record<string, any>) {
  // ...
  initLifecycle(vm)
  initEvents(vm)
  initRender(vm)
  callHook(vm, 'beforeCreate', undefined, false /* setContext */)
  initInjections(vm) // resolve injections before data/props
  initState(vm)
  initProvide(vm) // resolve provide after data/props
  callHook(vm, 'created')
  // ...
}可以看到beforeCreate和created的钩子调用是在initState的前后,initState的作用是初始化props、data、methods、watch、computed等属性,之后会详细分析。那么显然beforeCreate的钩子函数中就不能获取到props、data中定义的值,也不能调用methods中定义的函数。
beforeMount和mounted
顾名思义,beforeMount钩子函数发生在mount,也就是 DOM 挂载之前,它的调用时机是在mountComponent函数中
export function mountComponent(
  vm: Component,
  el: Element | null | undefined,
  hydrating?: boolean
): Component {
  vm.$el = el
  // ...
  callHook(vm, 'beforeMount')

  let updateComponent
  if (__DEV__ && config.performance && mark) {
    updateComponent = () => {
      const name = vm._name
      const id = vm._uid
      const startTag = `vue-perf-start:${id}`
      const endTag = `vue-perf-end:${id}`

      mark(startTag)
      const vnode = vm._render()
      mark(endTag)
      measure(`vue ${name} render`, startTag, endTag)

      mark(startTag)
      vm._update(vnode, hydrating)
      mark(endTag)
      measure(`vue ${name} patch`, startTag, endTag)
    }
  } else {
    updateComponent = () => {
      vm._update(vm._render(), hydrating)
    }
  }

  const watcherOptions: WatcherOptions = {
    before() {
      if (vm._isMounted && !vm._isDestroyed) {
        callHook(vm, 'beforeUpdate')
      }
    }
  }
  // ...
  new Watcher(vm, updateComponent, noop, watcherOptions, true /* isRenderWatcher */)
  hydrating = false

  const preWatchers = vm._preWatchers
  if (preWatchers) {
    for (let i = 0; i < preWatchers.length; i++) {
      preWatchers[i].run()
    }
  }

  if (vm.$vnode == null) {
    vm._isMounted = true
    callHook(vm, 'mounted')
  }
  return vm
}在执行vm._render()函数渲染VNode之前,执行了beforeMount钩子函数,在执行完vm._update()把VNodepatch 到真实 DOM 后,执行mounted钩子。
注意,这里对mounted钩子函数执行有一个判断逻辑,vm.$vnode如果为null,则表明这不是一次组件的初始化过程,而是我们通过外部new Vue初始化过程。那么对于组件,它的mounted时机在哪儿呢?
组件的VNodepatch 到 DOM 后,会执行invokeInsertHook函数,把insertedVnodeQueue里保存的钩子函数依次执行一遍
function invokeInsertHook(vnode, queue, initial) {
  if (isTrue(initial) && isDef(vnode.parent)) {
    vnode.parent.data.pendingInsert = queue
  } else {
    for (let i = 0; i < queue.length; ++i) {
      queue[i].data.hook.insert(queue[i])
    }
  }
}该函数会执行insert这个钩子函数,对于组件而言,insert钩子函数的定义在src/core/vdom/create-component.ts文件中的componentVNodeHooks对象中:
const componentVNodeHooks = {
  // ...
  insert(vnode: MountedComponentVNode) {
    const { context, componentInstance } = vnode
    if (!componentInstance._isMounted) {
      componentInstance._isMounted = true
      callHook(componentInstance, 'mounted')
    }
    // ...
  }
  // ...
}可以看到,每个子组件都是在这个钩子函数中执行mounted钩子函数,并且我们之前分析过,insertedVnodeQueue的添加顺序是「先子后父」,所以对于同步渲染的子组件而言,mounted钩子函数的执行顺序也是「先子后父」
beforeUpdate和updated
顾名思义,beforeUpdate和updated的钩子函数执行时机都应该是在数据更新的时候,到目前为止,我们还没有分析Vue的数据双向绑定、更新相关,下一章我会详细介绍这个过程
beforeUpdate的执行时机是在渲染Watcher的before函数中,我们刚才提到过:
export function mountComponent(
  vm: Component,
  el: Element | null | undefined,
  hydrating?: boolean
): Component {
  // ...
  const watcherOptions: WatcherOptions = {
    before() {
      if (vm._isMounted && !vm._isDestroyed) {
        callHook(vm, 'beforeUpdate')
      }
    }
  }
  // ...
  new Watcher(vm, updateComponent, noop, watcherOptions, true /* isRenderWatcher */)
  // ...
}注意这里有个判断,也就是在组件已经mounted且没有destroyed时,才会去调用这个钩子函数
update的执行时机是在flushSchedulerQueue函数调用的时候,它的定义在src/core/observer/scheduler.ts文件中:
function flushSchedulerQueue() {
  // ...
  // 获取到 updatedQueue
  callUpdatedHooks(updatedQueue)
  // ...
}

function callUpdatedHooks(queue: Watcher[]) {
  let i = queue.length
  while (i--) {
    const watcher = queue[i]
    const vm = watcher.vm
    if (vm && vm._watcher === watcher && vm._isMounted && !vm._isDestroyed) {
      callHook(vm, 'updated')
    }
  }
}flushSchedulerQueue函数我们之后会详细介绍,可以先大概了解一下,updatedQueue是更新了的wathcer数组,那么在callUpdatedHooks函数中,它对这些数组做遍历,只有满足条件时,才会执行updated钩子函数。
我们之前提过,在组件mount的过程中,会实例化一个渲染的Watcher去监听vm上的数据变化重新渲染,这段逻辑发生在mountComponent函数执行的时候:
export function mountComponent(
  vm: Component,
  el: Element | null | undefined,
  hydrating?: boolean
): Component {
  // ...
  // 这里是简写
  let updateComponent = () => {
    vm._update(vm._render(), hydrating)
  }
  const watcherOptions: WatcherOptions = {
    before() {
      if (vm._isMounted && !vm._isDestroyed) {
        callHook(vm, 'beforeUpdate')
      }
    }
  }
  // ...
  new Watcher(vm, updateComponent, noop, watcherOptions, true /* isRenderWatcher */)
  // ...
}在2.7.14LTS 版本中,在实例化Watcher的过程中,在它的构造函数里会判断isRenderWatcher,接着把当前watcher的实例赋值给vm._watcher,定义在src/core/observer/watcher.ts文件中:
export default class Watcher implements DepTarget {
  // ...
  constructor(
    vm: Component | null,
    expOrFn: string | (() => any),
    cb: Function,
    options?: WatcherOptions | null,
    isRenderWatcher?: boolean
  ) {
    recordEffectScope(
      this,
      activeEffectScope && !activeEffectScope._vm ? activeEffectScope : vm ? vm._scope : undefined
    )
    if ((this.vm = vm) && isRenderWatcher) {
      vm._watcher = this
    }
    // ...
  }
}

// src/v3/reactivity/effectScope.ts
export function recordEffectScope(
  effect: Watcher,
  scope: EffectScope | undefined = activeEffectScope
) {
  if (scope && scope.active) {
    scope.effects.push(effect)
  }
}同时,还把当前wathcer的实例通过recordEffectScope函数收集起来。vm._watcher是专门用来监听vm上数据变化然后重新渲染的,所以它是一个渲染相关的watcher,因此在callUpdatedHooks函数中,只有vm._watcher的回调执行完毕后,才会执行updated钩子函数
beforeDestroy和destroyed
顾名思义,beforeDestroy和destroyed钩子函数的执行时机在组件销毁的阶段,组件的销毁过程之后会详细介绍,最终会调用$destroy方法,它的定义在src/core/instance/lifecycle.ts文件中:
Vue.prototype.$destroy = function () {
  const vm: Component = this
  if (vm._isBeingDestroyed) {
    return
  }
  callHook(vm, 'beforeDestroy')
  vm._isBeingDestroyed = true
  // remove self from parent
  const parent = vm.$parent
  if (parent && !parent._isBeingDestroyed && !vm.$options.abstract) {
    remove(parent.$children, vm)
  }
  // teardown scope. this includes both the render watcher and other
  // watchers created
  vm._scope.stop()
  // remove reference from data ob
  // frozen object may not have observer.
  if (vm._data.__ob__) {
    vm._data.__ob__.vmCount--
  }
  // call the last hook...
  vm._isDestroyed = true
  // invoke destroy hooks on current rendered tree
  vm.__patch__(vm._vnode, null)
  // fire destroyed hook
  callHook(vm, 'destroyed')
  // turn off all instance listeners.
  vm.$off()
  // remove __vue__ reference
  if (vm.$el) {
    vm.$el.__vue__ = null
  }
  // release circular reference (#6759)
  if (vm.$vnode) {
    vm.$vnode.parent = null
  }
}beforeDestroy钩子函数的执行时机是在$destroy函数执行最开始的地方,接着执行了一系列的销毁动作,包括从parent的$children中删掉自身,删除watcher,当前渲染的VNode执行销毁钩子函数等,执行完毕后再调用destroyed钩子函数。
在$destroy的执行过程中,它又会执行vm.__patch__(vm._vnode, null)触发它子组件的销毁钩子函数,这样一层层的递归调用,所以destroyed钩子函数执行顺序也是「先子后父」,和mounted过程一样
总结
本章主要介绍了Vue生命周期中各个钩子函数的执行时机以及顺序,通过分析,我们知道了如在created钩子函数中可以访问到数据,在mounted钩子函数中可以访问到 DOM,在destroyed钩子函数中可以做一些定时器销毁工作,了解它们有利于我们在合适的生命周期去做不同的事情