✨
搭建一个开箱即用的 Taro + Vue + Pinia + TailwindCSS + TypeScript 工程
UI框架以 NutUI-Vue 为例
编写此笔记时所使用的Taro版本为3.6.18
相关文档
项目初始化
npm install -g @tarojs/cli
taro init taro-vue-starter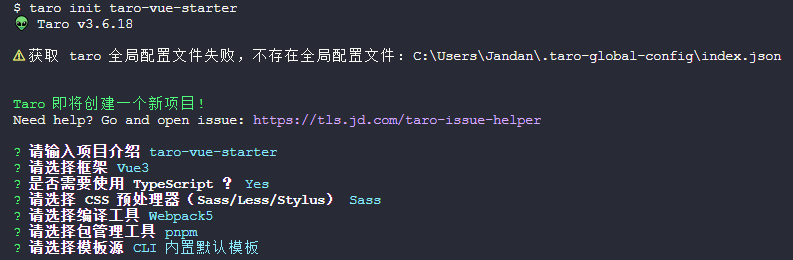
然后按照提示操作即可
💡
通过上述交互式命令的选项,我们创建了一个带有ESLint的 Vue 基础工程,接下来我们对它做亿点点额外的配置
配置ESLint和Prettier
这个方案废弃,因为有大佬做了个整合插件,看下面
- 安装Prettier
pnpm add -D prettier eslint-config-prettier eslint-plugin-prettier新建.prettierrc和.prettierignore文件,填入自己喜欢的配置
{
  "$schema": "https://json.schemastore.org/prettierrc",
  "semi": false,
  "tabWidth": 2,
  "printWidth": 120,
  "singleQuote": true,
  "trailingComma": "es5"
}node_modules
dist- 把
.eslintrc改成.eslintrc.js,并填入以下配置
module.exports = {
  root: true,
  env: {
    browser: true,
    es2021: true,
    node: true,
  },
  parser: '@typescript-eslint/parser',
  parserOptions: {
    ecmaVersion: 'latest',
    sourceType: 'module',
  },
  extends: [
    'eslint:recommended',
    'taro/vue3',
    'plugin:@typescript-eslint/recommended',
    'prettier',
    'plugin:prettier/recommended',
  ],
  plugins: ['@typescript-eslint', 'prettier'],
  overrides: [
    {
      env: {
        node: true,
      },
      files: ['.eslintrc.{js,cjs}'],
      parserOptions: {
        sourceType: 'script',
      },
    },
  ],
  rules: {
    complexity: ['error', 10],
    'prettier/prettier': 'error',
    'no-console': process.env.NODE_ENV === 'production' ? 'warn' : 'off',
    'no-debugger': process.env.NODE_ENV === 'production' ? 'warn' : 'off',
  },
}✨新方案,直接使用Nuxt团队的Anthony Fu大佬的eslint-config
pnpm dlx @antfu/eslint-config@latest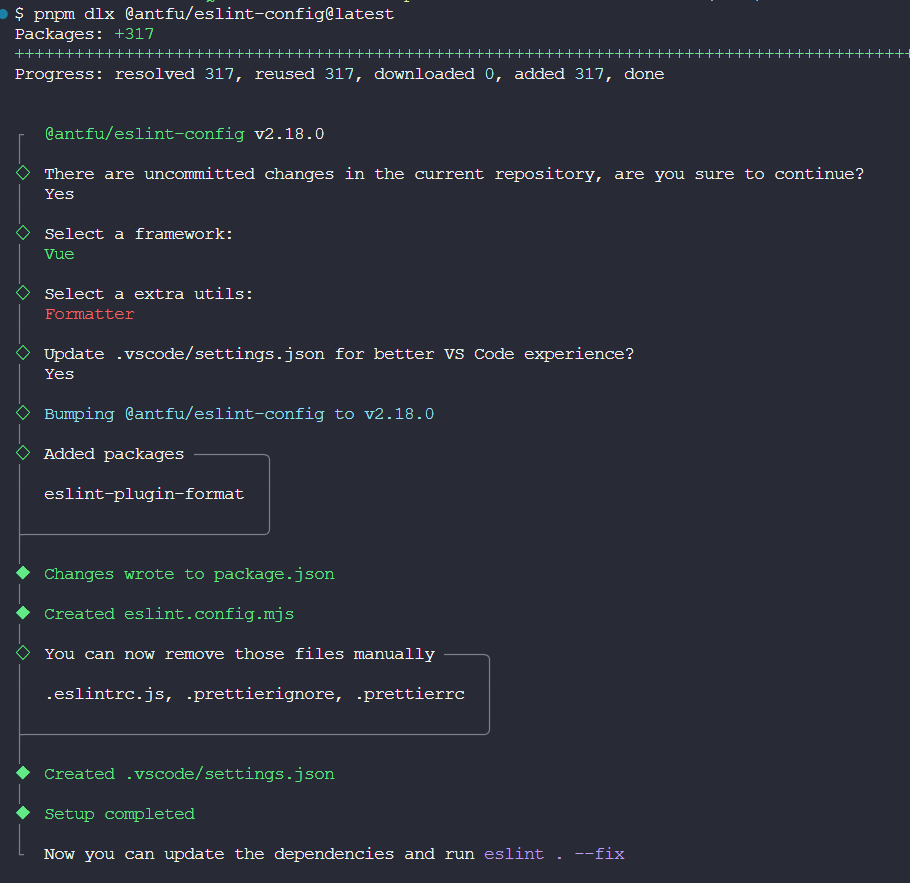
编辑eslint.config.mjs
import antfu from '@antfu/eslint-config'

export default antfu({
  ignores: ['node_modules', '**/node_modules/**', 'dist', '**/dist/**', '.swc', '**/.swc/**'],
  formatters: true,
  typescript: true,
  vue: true,
})编辑package.json,添加如下内容
{
  // ...
  "scripts": {
    // ...
    "lint": "eslint .",
    "lint:fix": "eslint . --fix"
  }
}
由于 Anthony Fu 大佬的这套eslint-config默认禁用prettier,如果你想配合prettier一起用的话就安装它(不用的话就跳过),然后在根目录新建.prettierrc,填入自己喜欢的配置
pnpm add -D prettier{
"$schema": "https://json.schemastore.org/prettierrc",
"semi": false,
"tabWidth": 2,
"printWidth": 120,
"singleQuote": true,
"trailingComma": "es5"
}接着编辑.vscode/settings.json,把prettier启用即可
{
  "prettier.enable": true
  // ...
}
环境变量
详细的文档看这里
根目录新建.env和.env.local文件,接着把项目初始化时自动生成的.env.dev重命名为.env.development,.env.prod重命名为.env.production,因为根据Taro的开发文档,默认的环境标识是development和production,而env文件的加载规则如下
.env                # 在所有的环境中被载入
.env.local          # 在所有的环境中被载入,但会被 git 忽略
.env.[mode]         # 只在指定的模式中被载入
.env.[mode].local # 只在指定的模式中被载入,但会被 git 忽略env文件中的环境变量默认要以TARO_APP_开头,否则不会被加载,之后就可以在src目录下的所有业务逻辑文件中使用p的形式来读取环境变量值了
安装TailwindCSS
在Taro中使用TailwindCSS的文档说明看这里
由于Taro已经内置有postcss和autoprefixer,这两个就不用装了
pnpm add -D tailwindcss
npx tailwindcss init -p编辑生成的tailwind.config.js
/** @type {import('tailwindcss').Config} */
module.exports = {
  content: ['./public/index.html', './src/**/*.{html,vue,js,ts,jsx,tsx}'],

  corePlugins: {
    preflight: false,
  },
  plugins: [],
}编辑src/app.scss
@import 'tailwindcss/base';
@import 'tailwindcss/components';
@import 'tailwindcss/utilities';
单位转化插件
pnpm add -D postcss-rem-to-responsive-pixel编辑postcss.config.js,进行插件的注册
const isH5 = process.env.TARO_ENV === 'h5'
module.exports = {
  plugins: {
    // ...
    'postcss-rem-to-responsive-pixel': {
      rootValue: 32, // 1rem = 32rpx
      propList: ['*'], // 默认所有属性都转化
      transformUnit: isH5 ? 'px' : 'rpx', // 转化的单位,可以变成 px / rpx
    },
  },
}
安装weapp-tailwindcss
pnpm add -D weapp-tailwindcss
npx weapp-tw patch编辑package.json
{
  "scripts": {
    // ...
    "postinstall": "weapp-tw patch"
  }
}编辑config/index.ts,注册weapp-tailwindcss
import { UnifiedWebpackPluginV5 } from 'weapp-tailwindcss/webpack'
const WeappTailwindcssDisabled = ['h5', 'rn'].includes(process.env.TARO_ENV)
export default defineConfig(async (merge, { command, mode }) => {
  const baseConfig: UserConfigExport = {
    // ...
    mini: {
      webpackChain(chain) {
        // ...
        chain.merge({
          plugin: {
            install: {
              plugin: UnifiedWebpackPluginV5,
              args: [{ appType: 'taro', disabled: WeappTailwindcssDisabled }],
            },
          },
        })
      },
    },
  }
})
助手函数
新建src/libs/utils.ts,封装一些辅助函数,具体代码参考我的助手函数封装
请求模块
pnpm add @tarojs/plugin-http axios编辑config/index.ts,注册插件
export default defineConfig(async (merge, { command, mode }) => {
  const baseConfig: UserConfigExport = {
    // ...
    plugins: ['@tarojs/plugin-http'],
  }
})新建src/api/core/http.ts和src/api/core/config.ts,之后的封装逻辑参考我的Axios封装
Mock
pnpm add -D @tarojs/plugin-mock mockjs @types/mockjs编辑config/dev.ts
export default {
  plugins: ['@tarojs/plugin-mock'],
  h5: {
    devServer: {
      proxy: {
        '/api': {
          target: process.env.TARO_APP_API,
          changeOrigin: true,
          pathRewrite: { '^/api': '' },
        },
      },
    },
  },
} satisfies UserConfigExport根目录新建mock/index.ts,示例如下,根据自己的情况添加添加接口
export default {
  'POST /api/login': {
    code: '200',
    message: 'ok',
    data: 'eyJ0eXAiOiJKV1QiLCJhbGciOiJIUzI1NiJ9.eyJpZCI6MjMyODU2LCJzZXNzaW9uIjoiOTRlZTZjOThmMmY4NzgzMWUzNzRmZTBiMzJkYTIwMGMifQ.z5Llnhe4muNsanXQSV-p1DJ-89SADVE-zIkHpM0uoQs',
    success: true,
  },
}当启动开发服务器的时候就会启动一个数据mock服务器
UI框架
使用NutUI-Vue
详细的文档看这里
pnpm add @nutui/nutui-taro @nutui/icons-vue-taro @tarojs/plugin-html编辑config/index.ts
import path from 'node:path'
export default defineConfig(async (merge, { command, mode }) => {
  const baseConfig: UserConfigExport = {
    // ...
    designWidth: (input: any) => {
      if (input?.file?.replace(/\\+/g, '/').indexOf('@nutui') > -1) {
        return 375
      }
      return 750
    },
    plugins: ['@tarojs/plugin-html'],
    alias: {
      '@': path.resolve(__dirname, '../src'),
    },
    sass: {
      data: '@import "@nutui/nutui-taro/dist/styles/variables.scss";',
    },
    mini: {
      postcss: {
        pxtransform: {
          enable: true,
          config: {
            selectorBlackList: ['nut-'],
          },
        },
      },
    },
    h5: {
      esnextModules: ['nutui-taro', 'icons-vue-taro'],
      postcss: {
        pxtransform: {
          enable: true,
          config: {
            selectorBlackList: ['nut-'],
          },
        },
      },
    },
  }
})
按需引入和JSX支持
pnpm add -D unplugin-vue-components编辑config/index.ts
import ComponentsPlugin from 'unplugin-vue-components/webpack'
import NutUIResolver from '@nutui/nutui-taro/dist/resolver'
export default defineConfig(async (merge, { command, mode }) => {
  const baseConfig: UserConfigExport = {
    // ...
    mini: {
      webpackChain(chain) {
        chain.plugin('unplugin-vue-components').use(
          ComponentsPlugin({
            include: [
              /\.[tj]sx?$/, // .ts, .tsx, .js, .jsx
              /\.vue$/,
              /\.vue\?vue/, // .vue
            ],
            resolvers: [NutUIResolver({ taro: true })],
          })
        )
      },
    },
    h5: {
      webpackChain(chain) {
        chain.plugin('unplugin-vue-components').use(
          ComponentsPlugin({
            include: [
              /\.[tj]sx?$/, // .ts, .tsx, .js, .jsx
              /\.vue$/,
              /\.vue\?vue/, // .vue
            ],
            resolvers: [NutUIResolver({ taro: true })],
          })
        )
      },
    },
  }
})编辑tsconfig.json,在include字段中加入components.d.ts
{
  "include": [
    // ...
    "components.d.ts"
  ]
}
状态管理
pnpm add pinia编辑src/app.ts,注册 Pinia
import { createPinia } from 'pinia'
const App = createApp({
  // ...
}).use(createPinia())
export default App
定义
新建src/stores/counter.ts
import { defineStore } from 'pinia'

export const useCounterStore = defineStore('counter', {
  state: () => ({ count: 0 }),
  actions: {
    increment() {
      this.count++
    },
    decrement() {
      this.count--
    },
  },
})
示例
新建两个页面用来测试,并将其设置为tabbar
taro create home
taro create profile编辑src/app.config.ts和新建的两个页面
const pages = ['pages/index/index', 'pages/home/index', 'pages/profile/index']
export default defineAppConfig({
  animation: true,
  entryPagePath: 'pages/index/index',
  pages,
  tabBar: {
    color: '#666666',
    selectedColor: '#4965f2',
    backgroundColor: '#fefefe',
    list: [
      {
        pagePath: 'pages/home/index',
        text: '首页',
      },
      {
        pagePath: 'pages/profile/index',
        text: '我的',
      },
    ],
  },
  // ...
})import { View, Text, Button } from '@tarojs/components'
import { defineComponent } from 'vue'
import { useCounterStore } from '@/stores'
import './index.scss'
export default defineComponent({
setup() {
const counter = useCounterStore()
return () => (
<View class="flex flex-1 flex-wrap flex-col items-center justify-center gap-4 h-full">
<Text>Home Page</Text>
<View class="text-center">
<Button type="warn" onClick={counter.decrement}>
Dec
</Button>
<Text>{counter.count}</Text>
<Button type="primary" onClick={counter.increment}>
Inc
</Button>
</View>
</View>
)
},
})<template>
<view class="flex flex-1 flex-wrap flex-col items-center justify-center gap-4 h-full">
<text>Profile Page</text>
<view class="text-center">
<button type="warn" @tap="counter.decrement">Dec</button>
<text>{{ counter.count }}</text>
<button type="primary" @tap="counter.increment">Inc</button>
</view>
</view>
</template>
<script setup>
import { useCounterStore } from '@/stores'
import './index.scss'
const counter = useCounterStore()
</script>持久化
pnpm add pinia-plugin-persistedstate编辑src/app.ts,注册持久化插件
import piniaPluginPersistedstate from 'pinia-plugin-persistedstate'
const App = createApp({
  // ...
}).use(createPinia().use(piniaPluginPersistedstate))
export default App新建src/libs/storage.ts和src/stores/user.ts
import { setStorageSync, getStorageSync, removeStorageSync } from '@tarojs/taro'
import { StorageLike } from 'pinia-plugin-persistedstate'

enum StorageSceneKey {
  USER = 'storage-user',
}

function getItem<T = any>(key: string): T {
  const value = getStorageSync(key)
  return value ? JSON.parse(value) ?? null : null
}
function setItem(key: string, value: any) {
  setStorageSync(key, JSON.stringify(value))
}
function removeItem(key: string) {
  removeStorageSync(key)
}

export { getItem, setItem, removeItem, StorageSceneKey }

/** @description 用来给 pinia 持久化存储的方法 */
export const piniaStorage: StorageLike = {
  getItem: (key) => {
    const value = getStorageSync(key)
    return value ?? null
  },
  setItem: (key, value) => {
    setStorageSync(key, value)
  },
}import { defineStore } from 'pinia'
import { ref } from 'vue'
import { piniaStorage, StorageSceneKey } from '../libs'
export const useUserStore = defineStore(
'user',
() => {
const token = ref('')
const isLogged = ref(false)
const setToken = (value: string) => {
token.value = value
isLogged.value = true
}
const removeToken = () => {
token.value = ''
isLogged.value = false
}
return { token, isLogged, setToken, removeToken }
},
{
persist: {
//! 注意这里的key是当前这个Pinia模块进行缓存时的唯一key, 每个需要缓存的Pinia模块都必须分配一个唯一key
key: StorageSceneKey.USER,
// pinia-plugin-persistedstate 插件的默认持久化方案只支持web端,在Taro里使用需要自定义进行覆盖
storage: piniaStorage,
},
}
)路由权限
①路由状态
新建src/stores/auth.ts,用来记录重定向的信息,编辑src/libs/storage.ts,增加一个pinia持久化场景
import { defineStore } from 'pinia'
import { StorageSceneKey, piniaStorage } from '../libs'

interface Redirect {
  url: string
  tab?: boolean
}
interface AuthState {
  redirect: Redirect | null
}

export const useAuthStore = defineStore('auth', {
  state: (): AuthState => ({ redirect: null }),
  actions: {
    setRedirect(value: Redirect) {
      this.redirect = value
    },
    clear() {
      this.redirect = null
    },
  },
  persist: {
    key: StorageSceneKey.AUTH,
    storage: piniaStorage,
  },
})enum StorageSceneKey {
// ...
AUTH = 'storage-auth',
}②封装uni-app的路由跳转
新建src/router/index.ts,对Taro的路由跳转做一层权限控制的封装
查看
import Taro from '@tarojs/taro'
import { useUserStore } from '../stores'
import { utils } from '../libs'

interface AnyObj {
  [key: string]: any
}
type RouterType = 'navigateTo' | 'redirectTo' | 'switchTab' | 'reLaunch' | 'navigateBack'
type SuccessCallback =
  | TaroGeneral.CallbackResult
  | (TaroGeneral.CallbackResult & { eventChannel: Taro.EventChannel })
interface TaroRouterOptions<S = SuccessCallback>
  extends Omit<Taro.navigateTo.Option, 'success'>,
    Omit<Taro.navigateBack.Option, 'success'>,
    Omit<Taro.redirectTo.Option, 'success'>,
    Omit<Taro.reLaunch.Option, 'success'>,
    Omit<Taro.switchTab.Option, 'success'> {
  data?: string | AnyObj
  success?: (res: S) => void
}

function searchParams2Obj(params: any) {
  const searchParams = new URLSearchParams(params)
  const obj: AnyObj = {}
  for (const [key, value] of searchParams.entries()) {
    obj[key] = value
  }
  return obj
}

/**
 * 路由跳转处理
 */
function authCheck(urlKey: string, type: RouterType, options: TaroRouterOptions) {
  const isLogged = useUserStore().isLogged
  if (authRoutes.includes(urlKey)) {
    if (!isLogged) {
      // TODO 补充自己的业务逻辑
      return
    }
    navigate(type, options)
  } else {
    navigate(type, options)
  }
}
/**
 * 执行路由跳转
 */
function navigate(type: RouterType, options: TaroRouterOptions) {
  const { data, ...rest } = options
  if (!['navigateTo', 'redirectTo', 'switchTab', 'reLaunch'].includes(type)) return
  if (!rest.url.startsWith('/')) {
    rest.url = `/${rest.url}`
  }
  Taro[type](rest)
}

const singletonEnforcer = Symbol('Router')
class Router {
  private static _instance: Router
  constructor(enforcer: any) {
    if (enforcer !== singletonEnforcer) {
      throw new Error('Cannot initialize single instance')
    }
  }
  static get instance() {
    // 如果已经存在实例则直接返回, 否则实例化后返回
    this._instance || (this._instance = new Router(singletonEnforcer))
    return this._instance
  }
  /**
   * 路由中间件,做跳转前的代理
   */
  private middleware(type: RouterType, options: TaroRouterOptions) {
    let { url = '', data = {}, events, ...rest } = options
    let [urlKey, queryStr] = url.split('?')
    // 单独存一份url,待会要用
    urlKey = urlKey
      .split('/')
      .filter((e) => e !== '')
      .join('/')
    try {
      if (type === 'navigateBack') {
        Taro.navigateBack(rest)
      } else {
        if (!urlKey.trim() || !routes.includes(urlKey)) {
          throw Error('无效的路由')
        }
        if (type === 'switchTab') {
          url = urlKey
        } else {
          let obj: AnyObj = {}
          if (data && typeof data === 'string' && data.trim()) {
            data = searchParams2Obj(data)
          }
          if (queryStr && queryStr.trim()) {
            obj = searchParams2Obj(queryStr)
          }
          const str = new URLSearchParams(utils.merge(data as object, obj)).toString()
          url = str ? `${urlKey}?${str}` : urlKey
        }
        authCheck(urlKey, type, { ...rest, url, events })
      }
    } catch (error) {
      // TODO
      console.error(error.message)
    }
  }
  /**
   * 跳转到 tabBar 页面,并关闭其他所有非 tabBar 页面
   */
  switchTab(options: TaroRouterOptions) {
    this.middleware('switchTab', options)
  }
  /**
   * 关闭所有页面,打开到应用内的某个页面
   */
  reLaunch(options: TaroRouterOptions) {
    this.middleware('reLaunch', options)
  }
  /**
   * 关闭当前页面,跳转到应用内的某个页面。但是不允许跳转到 tabbar 页面
   */
  redirectTo(options: TaroRouterOptions) {
    this.middleware('redirectTo', options)
  }
  /**
   * 保留当前页面,跳转到应用内的某个页面。但是不能跳到 tabbar 页面
   */
  navigateTo(options: TaroRouterOptions) {
    this.middleware('navigateTo', options)
  }
  /**
   * 关闭当前页面,返回上一页面或多级页面
   */
  navigateBack(options: Omit<TaroRouterOptions, 'url'>) {
    this.middleware('navigateBack', { url: '', ...options })
  }
}
// 需要权限的路由,注意首尾不能带有斜杠
const authRoutes = ['pages/home/index', 'pages/profile/index']
// 全部路由
const routes = ['pages/blank/index', 'pages/index/index', 'pages/home/index', 'pages/profile/index']
export default Router.instance
③权限钩子
新建src/hooks/useAuth.ts权限钩子函数,对直接访问 URL 的方式进行拦截
import { useDidShow, getCurrentInstance } from '@tarojs/taro'
import { useUserStore, useAuthStore } from '../stores'
import router from '../router'
const tabbar = ['/pages/home/index', '/pages/profile/index']

export const useAuth = () => {
  const isLogged = useUserStore().isLogged
  const setRedirect = useAuthStore().setRedirect
  const current = getCurrentInstance().router
  const path = current ? current.path.split('?')[0] : ''
  const isTab = tabbar.includes(path)
  const routeParams = current?.params
  const params = {}
  for (const [key, value] of Object.entries(routeParams ?? {})) {
    if (!['stamp', '$taroTimestamp'].includes(key)) {
      params[key] = value
    }
  }
  useDidShow(() => {
    if (!isLogged) {
      const str = new URLSearchParams(params).toString()
      setRedirect({ tab: isTab, url: str ? `${path}?${str}` : path })
      router.reLaunch({ url: '/pages/index/index' })
    }
  })
}
④使用示例
新建一个空白页面用来做权限判断的跳板页,并将其设置为启动页面
taro create blankexport default defineAppConfig({
entryPagePath: 'pages/blank/index',
// ...
})编辑blank、index和home页面
import { defineComponent } from 'vue'
import { useLoad } from '@tarojs/taro'
import { useUserStore } from '@/stores'
import router from '@/router'
export default defineComponent({
  setup() {
    const userStore = useUserStore()
    useLoad(() => {
      if (userStore.isLogged) {
        router.switchTab({ url: '/pages/home/index' })
      } else {
        router.reLaunch({ url: '/pages/index/index' })
      }
    })
    return null
  },
})<template>
<view class="flex flex-col items-center justify-center gap-2 h-full">
<button @tap="login">Go Home</button>
</view>
</template>
<script setup lang="ts">
import { request } from '@/api'
import { useUserStore, useAuthStore } from '@/stores'
import router from '@/router'
const setToken = useUserStore().setToken
const auth = useAuthStore()
const login = async () => {
const res = await request('/api/login', { method: 'post' })
setToken(res.data)
if (auth.redirect?.url) {
const success = () => {
auth.clear()
}
auth.redirect.tab
? router.switchTab({
url: auth.redirect.url,
success,
})
: router.redirectTo({
url: auth.redirect.url,
success,
})
} else {
router.switchTab({ url: '/pages/home/index' })
}
}
</script>// ...
import { useAuth } from '@/hooks'
export default defineComponent({
setup() {
useAuth()
// ...
},
})