✨
搭建一个开箱即用的基于 Expo + ReactNavigation + Zustand + MMKV + TailwindCSS + TypeScript 的工程
编写此笔记时所使用的Expo版本为49.0.16
相关文档
事前准备
- Windows 或者 Linux
- VSCode:编辑器
- nodejs:项目运行所需要的基础环境
- git:代码版本控制
- AndroidStudio:Android 虚拟机调试 App
项目初始化
我初始化项目时用的 Expo SDK 版本是49
pnpm create expo-app -t expo-template-blank-typescript由于使用pnpm创建的 Expo 项目缺少了.npmrc文件,我们需要在项目根目录手动创建它,并填入node-linker=hoisted
touch .npmrc
echo node-linker=hoisted > .npmrc接着删除node_modules目录和pnpm-lock.yaml文件,然后重新执行一遍依赖的安装
rm -rf node_modules
rm pnpm-lock.yaml
pnpm install最后执行pnpm start启动项目,不出意外的话就会唤起 Android 虚拟机打开 App 了
这样就创建好一个以 Expo 为脚手架的基础工程了,接下来我们对它做亿点点额外的配置
配置EditorConfig
新建.editorconfig,设置编辑器和 IDE 规范,内容根据自己的喜好或者团队规范
touch .editorconfig# https://editorconfig.org
root = true
[*]
charset = utf-8
indent_style = space
indent_size = 2
end_of_line = lf
insert_final_newline = true
trim_trailing_whitespace = true
[*.md]
insert_final_newline = false
trim_trailing_whitespace = false安装ESLint
npx eslint --init选第二个
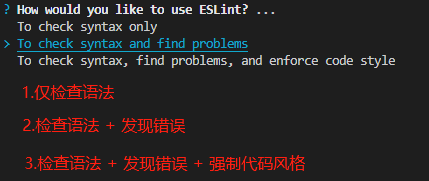
选第一个
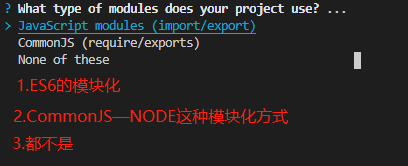
选其他,因为等下会安装RN社区的整合插件

选TypeScript,然后运行环境按a全选

ESLint配置文件的的保存格式,选第一个

是否立即安装所需的依赖,选 Yes

这里根据项目构建所使用的包管理器进行选择,因为本项目使用pnpm,所以选第三个

新建.eslintignore文件,填入自己喜欢的配置
touch .eslintignorenode_modules
android
ios
.expo
.expo-shared
.vscode
.ideaRN社区的ESLint插件
pnpm add -D @react-native-community/eslint-plugin @react-native-community/eslint-config安装Prettier
pnpm add -D prettier eslint-config-prettier eslint-plugin-prettier新建.prettierrc和.prettierignore文件,填入自己喜欢的配置
touch .prettierrc
touch .prettierignore{
"$schema": "https://json.schemastore.org/prettierrc",
"semi": false,
"tabWidth": 2,
"printWidth": 120,
"singleQuote": true,
"trailingComma": "es5"
}node_modules
android
ios
.expo
.expo-shared
.vscode
.idea整合ESLint和Prettier
编辑.eslintrc.js
查看
module.exports = {
  root: true,
  env: {
    browser: true,
    es2021: true,
    node: true,
  },
  parser: '@typescript-eslint/parser',
  parserOptions: {
    ecmaVersion: 'latest',
    sourceType: 'module',
  },
  extends: [
    'eslint:recommended',
    'plugin:@typescript-eslint/recommended',
    '@react-native-community',
    'prettier',
    'plugin:prettier/recommended',
  ],
  plugins: ['@react-native-community', 'prettier'],
  overrides: [
    {
      env: {
        node: true,
      },
      files: ['.eslintrc.{js,cjs}'],
      parserOptions: {
        sourceType: 'script',
      },
    },
  ],
  rules: {
    complexity: ['error', 10],
    'prettier/prettier': 'error',
    'no-console': process.env.NODE_ENV === 'production' ? 'warn' : 'off',
    'no-debugger': process.env.NODE_ENV === 'production' ? 'warn' : 'off',
  },
}
配置tsconfig
{
  "extends": "expo/tsconfig.base",
  "compilerOptions": {
    "strict": true,
    "baseUrl": ".",
    "paths": {
      "~/*": ["src/*"]
    }
  },
  "include": ["src", "types"],
  "exclude": [
    "node_modules",
    "android",
    "ios",
    "babel.config.js",
    "metro.config.js",
    ".eslintrc.js"
  ]
}
开启路径别名
编辑app.json,添加experiments字段
{
  "expo": {
    // ...
    "experiments": {
      "tsconfigPaths": true
    }
  }
}
调整目录结构
项目根目录新建src文件夹,把App.tsx移入其中,新建index.ts文件作为应用入口,并填入以下内容
mkdir src
mv App.tsx src/App.tsx
touch index.tsimport { registerRootComponent } from 'expo'
import App from './src/App'
registerRootComponent(App){
// ...
"main": "index.ts"
}环境变量
npx expo install expo-constants
pnpm add -D cross-env dotenv zod- 根目录新建
.env或.env.local和env.js文件
查看
# 应用配置
EXPO_PUBLIC_UI_WIDTH=375
EXPO_PUBLIC_UI_HEIGHT=812
EXPO_PUBLIC_API_URL=http://localhost:3000
EXPO_PUBLIC_API_PREFIX=/api
API_KEY=your_api_keyconst fs = require('fs')
const path = require('path')
const { parse } = require('dotenv')
const z = require('zod')
const NODE_ENV = process.env.NODE_ENV ?? 'development'
/**
* 同步读取文件
* @param {string} file
* @returns {fs.Stats | undefined}
*/
function tryStatSync(file) {
try {
return fs.statSync(file, { throwIfNoEntry: false })
} catch {}
}
/**
* 转成数组
* @param {string | string[]} target
* @returns {string[]}
*/
function toArray(target) {
return Array.isArray(target) ? target : [target]
}
/**
* 获取env文件列表
* @param {string} mode
* @returns {string[]}
*/
function getEnvFilesForMode(mode) {
return [
/** default file */ `.env`,
/** local file */ `.env.local`,
/** mode file */ `.env.${mode}`,
/** mode local file */ `.env.${mode}.local`,
]
}
/**
* 一个用于给传入变量加上环境标识的函数
* @param {string} name
* @returns {string}
*/
function withEnvSuffix(name) {
return NODE_ENV === 'production' ? name : `${name}.${NODE_ENV}`
}
/**
* 加载环境变量
* @param {string} envDir
* @param {string | string[]} prefixes
* @returns {object}
*/
function loadEnv(envDir, prefixes = 'EXPO_PUBLIC_') {
prefixes = toArray(prefixes)
const env = {}
const envFiles = getEnvFilesForMode(NODE_ENV)
const parsed = Object.fromEntries(
envFiles.flatMap((file) => {
const filePath = path.resolve(envDir, file)
if (!tryStatSync(filePath)?.isFile()) return []
return Object.entries(parse(fs.readFileSync(filePath)))
})
)
for (const [key, value] of Object.entries(parsed)) {
if (prefixes.some((prefix) => !key.startsWith(prefix))) {
env[key] = value
}
}
return env
}
const config = loadEnv(__dirname)
// 定义客户端常量的类型模式
const clientSchema = z.object({
NODE_ENV: z.enum(['development', 'test', 'production']),
API_KEY: z.string(),
})
/** @type {Record<keyof z.infer<typeof clientSchema>, string | undefined>} */
const _clientEnv = {
NODE_ENV,
API_KEY: config.API_KEY,
}
module.exports = {
withEnvSuffix,
ClientEnv: clientSchema.parse(_clientEnv),
}- 把
app.json改成app.config.ts
查看
import { ExpoConfig, ConfigContext } from 'expo/config'
const { name, version } = require('./package.json')
import { ClientEnv } from './env'
export default ({ config }: ConfigContext): ExpoConfig => {
  return {
    ...config,
    name,
    slug: name,
    description: '一个简单的Expo基础项目模板',
    version,
    orientation: 'portrait',
    userInterfaceStyle: 'automatic',
    scheme: `com.${name}.linking`,
    assetBundlePatterns: ['**/*'],
    experiments: {
      tsconfigPaths: true,
    },
    icon: './assets/icon.png',
    splash: {
      image: './assets/splash.png',
      resizeMode: 'contain',
      backgroundColor: '#ffffff',
    },
    ios: {
      supportsTablet: true,
      entitlements: {
        'com.apple.developer.networking.wifi-info': true,
      },
    },
    android: {
      adaptiveIcon: {
        foregroundImage: './assets/adaptive-icon.png',
        backgroundColor: '#ffffff',
      },
    },
    web: {
      favicon: './assets/favicon.png',
    },
    extra: {
      ...ClientEnv,
    },
  }
}- 新建
types/global.d.ts文件,用来声明全局变量、函数、接口和类型等 - 新建
src/constants/env.ts文件,用来导出 Expo 传递进来的环境变量 - 编辑
tsconfig.json,增加一个路径别名@env指向src/constants/env.ts
declare module '@env' {
  interface Env {
    NODE_ENV: 'development' | 'test' | 'production'
    API_KEY: string
  }
  export const Env: Env
}import Constants from 'expo-constants'
const Env = Constants.expoConfig?.extra ?? {}
if (Env.hasOwnProperty('eas')) {
delete Env.eas
}
export { Env }{
"compilerOptions": {
"paths": {
"@env": ["src/constants/env.ts"]
}
}
}EAS云构建服务
打开Expo控制台,创建一个新的项目,然后把生成的ID复制下来填入环境变量EAS_PROJECT_ID
npx expo install expo-dev-client
pnpm add -D app-icon-badge- 在
.env.local文件中添加新的环境变量
# 构建配置
ANDROID_PACKAGE=com.jandan
APPLE_BUNDLE_ID=com.jandan
EAS_PROJECT_ID=刚才生成的ID
EXPO_ACCOUNT_OWNER=jandan- 编辑入口文件
index.ts
import 'expo-dev-client' - 编辑
env.js文件
查看
// ...
// 定义构建工具常量的类型模式
const buildSchema = z.object({
  ANDROID_PACKAGE: z.string(),
  APPLE_BUNDLE_ID: z.string(),
  EAS_PROJECT_ID: z.string(),
  EXPO_ACCOUNT_OWNER: z.string(),
})
/** @type {Record<keyof z.infer<typeof buildSchema>, string | undefined>} */
const _buildEnv = {
  ANDROID_PACKAGE: withEnvSuffix(config.ANDROID_PACKAGE),
  APPLE_BUNDLE_ID: withEnvSuffix(config.APPLE_BUNDLE_ID),
  EAS_PROJECT_ID: config.EAS_PROJECT_ID,
  EXPO_ACCOUNT_OWNER: config.EXPO_ACCOUNT_OWNER,
}
// 合并环境变量
const _env = { ..._clientEnv, ..._buildEnv }
// 合并类型模式
const mergeSchema = buildSchema.merge(clientSchema)
const parsed = mergeSchema.safeParse(_env)
if (parsed.success === false) {
  throw new Error('无效的环境变量')
}
module.exports = {
  // ...
  Env: parsed.data,
}- 编辑
app.config.ts
查看
// ...
import { Env, ClientEnv } from './env'
export default ({ config }: ConfigContext): ExpoConfig => {
  return {
    // ...
    owner: Env.EXPO_ACCOUNT_OWNER,
    ios: {
      bundleIdentifier: Env.APPLE_BUNDLE_ID,
    },
    android: {
      package: Env.ANDROID_PACKAGE,
    },
    plugins: [
      [
        'app-icon-badge',
        {
          enabled: Env.NODE_ENV !== 'production',
          badges: [
            { text: Env.NODE_ENV, type: 'banner', color: 'white' },
            { text: version, type: 'ribbon', color: 'white' },
          ],
        },
      ],
    ],
    extra: {
      eas: {
        ...(Env.EAS_PROJECT_ID && { projectId: Env.EAS_PROJECT_ID }),
      },
    },
  }
}安装EAS
npm i -g eas-cli
eas build:configure选All,然后会在根目录自动创建一个eas.json文件

预构建
所谓预构建其实就是打debug包
npx expo prebuild
expo run:android
安全区适配和手势插件
npx expo install react-native-safe-area-context react-native-gesture-handler编辑入口文件index.ts和src/App.tsx
import 'react-native-gesture-handler' import { StatusBar } from 'expo-status-bar'
import { StyleSheet, Text, View } from 'react-native';
import { GestureHandlerRootView } from 'react-native-gesture-handler'
import { SafeAreaProvider } from 'react-native-safe-area-context'
export default function App() {
return (
<SafeAreaProvider>
<GestureHandlerRootView style={{ flex: 1 }}>
<View style={styles.container}>
<Text>Open up App.tsx to start working on your app!</Text>
</View>
<StatusBar style="auto" />
</GestureHandlerRootView>
</SafeAreaProvider>
)
}
// ...安装TailwindCSS
pnpm add -D tailwindcss
npx tailwindcss init/** @type {import('tailwindcss').Config} */
module.exports = {
content: ['./src/**/*.{js,jsx,ts,tsx}'],
corePlugins: {
preflight: false,
},
plugins: [],
}由于 App 端使用的尺寸单位是dp,不支持TailwindCSS的单位,需要安装一个插件来做转换处理
pnpm add twrnc新建src/utils/tailwind.ts文件,编辑src/App.tsx
import { create } from 'twrnc'
export default create(require('../../tailwind.config'))// ...
import { useDeviceContext } from 'twrnc'
import { tw } from './utils'
export default function App() {
useDeviceContext(tw)
// ...
}助手函数
新建src/utils/utils.ts,封装一些辅助函数,具体代码参考我的助手函数封装
请求模块
pnpm add axios新建src/api/core/http.ts和src/api/core/config.ts,之后的封装逻辑参考我的Axios封装
屏幕适配
新建src/utils/global.ts,编辑types/global.d.ts和入口文件index.ts
// ...
type Prettify<T> = { [P in keyof T]: T[P] } & {}
type ScaleBased = 'w' | 'h'
/**
 * 获取设计稿中像素值的真实dp
 * @param uiSize 设计稿尺寸
 * @param based 基准比例方案,默认用宽度方案
 * @returns
 */
function dp(uiSize: number, based: ScaleBased = 'w'): numberimport { Dimensions, PixelRatio } from 'react-native'
// UI设计稿尺寸,单位px
const designSize = Object.freeze({
width: parseInt(process.env.EXPO_PUBLIC_UI_WIDTH as string),
height: parseInt(process.env.EXPO_PUBLIC_UI_HEIGHT as string),
})
// 获取设备屏幕尺寸,单位dp
const { width, height } = Dimensions.get('window')
// 设计稿缩放比
const designScale = Object.freeze({
w: width / designSize.width,
h: height / designSize.height,
})
const operation = Object.freeze({
size: (uiSize: number, based: ScaleBased) => uiSize * designScale[based],
px2dp: (px: number) => parseFloat(PixelRatio.roundToNearestPixel(px).toFixed(2)),
})
global.dp = function (uiSize: number, based: ScaleBased = 'w') {
return uiSize > 1 ? operation.px2dp(operation.size(uiSize, based)) : uiSize
}import './src/utils/global' 路由导航
pnpm add react-native-screens @react-navigation/native @react-navigation/native-stack @react-navigation/bottom-tabs新建src/pages目录,用来存放应用的所有页面,接着新建三个页面用来测试,参考如下
Onboardingindex.tsx
Homeindex.tsx
Profileindex.tsx
查看
import { View, Button } from 'react-native'
import { SafeAreaView } from 'react-native-safe-area-context'
import { tw } from '~/utils'
import { AppStackScreenProps, AppStacks } from '~/routes/types'

type Props = AppStackScreenProps<AppStacks>
export default ({ navigation }: Props) => {
  return (
    <SafeAreaView style={tw`flex-1 items-center justify-center`}>
      <View>
        <Button
          title="Go Profile"
          onPress={() => navigation.navigate('BOTTOM_TABS', { screen: 'PROFILE' })}
        ></Button>
      </View>
    </SafeAreaView>
  )
}import { View, Button } from 'react-native'
import { SafeAreaView } from 'react-native-safe-area-context'
import { tw } from '~/utils'
import { TabsStackScreenProps, TabsStacks } from '~/routes/types'
type Props = TabsStackScreenProps<TabsStacks>
export default ({ navigation }: Props) => {
return (
<SafeAreaView style={tw`flex-1 items-center justify-center`}>
<View>
<Button title="Go Orboarding" onPress={() => navigation.navigate('ONBOARDING')}></Button>
</View>
</SafeAreaView>
)
}import { View, Text } from 'react-native'
import { SafeAreaView } from 'react-native-safe-area-context'
import { tw } from '~/utils'
export default () => {
return (
<SafeAreaView style={tw`flex-1 items-center justify-center`}>
<View>
<Text>Profile</Text>
</View>
</SafeAreaView>
)
}新建src/routes目录,用来管理应用的路由。在routes目录下新建AppNavigator.tsx、TabsNavigator.tsx和types.ts
查看
import { BottomTabScreenProps } from '@react-navigation/bottom-tabs'
import { CompositeScreenProps, NavigatorScreenParams } from '@react-navigation/native'
import { NativeStackScreenProps } from '@react-navigation/native-stack'

export enum AppStacks {
  ONBOARDING = 'ONBOARDING',
  BOTTOM_TABS = 'BOTTOM_TABS',
}

export enum TabsStacks {
  HOME = 'HOME',
  PROFILE = 'PROFILE',
}

export type AppStackParamList = {
  BOTTOM_TABS: NavigatorScreenParams<TabsStackParamList> | undefined
} & {
  [K in Exclude<keyof typeof AppStacks, 'BOTTOM_TABS'>]: undefined
}
export type AppStackScreenProps<T extends keyof AppStackParamList> = NativeStackScreenProps<
  AppStackParamList,
  T
>

export type TabsStackParamList = {
  [K in keyof typeof TabsStacks]: undefined
}
export type TabsStackScreenProps<T extends keyof TabsStackParamList> = CompositeScreenProps<
  BottomTabScreenProps<TabsStackParamList, T>,
  AppStackScreenProps<keyof typeof AppStacks>
>

export type RootStacks = AppStacks | TabsStacks
export type RootStackParamList = Prettify<AppStackParamList & TabsStackParamList>
export type RootStackScreenProps<T extends keyof RootStackParamList> = CompositeScreenProps<
  NativeStackScreenProps<RootStackParamList, T>,
  BottomTabScreenProps<TabsStackParamList>
>import {
NativeStackNavigationOptions,
createNativeStackNavigator,
} from '@react-navigation/native-stack'
import { AppStacks, AppStackParamList, AppStackScreenProps } from './types'
import { OnboardingScreen } from '../pages'
import TabsNavigator from './TabsNavigator'
interface AppScreenOptions {
title: string
component: React.FC<AppStackScreenProps<AppStacks>>
options: NativeStackNavigationOptions
}
const AppScreens: Record<AppStacks, AppScreenOptions> = {
[AppStacks.BOTTOM_TABS]: {
title: 'BottomTabs',
component: TabsNavigator,
options: {
headerShown: false, // 隐藏tabbar屏幕的导航栏
},
},
[AppStacks.ONBOARDING]: {
title: 'Onboarding',
component: OnboardingScreen,
options: { headerShown: false },
},
}
const AppStack = createNativeStackNavigator<AppStackParamList>()
export default () => {
return (
<AppStack.Navigator
initialRouteName={AppStacks.ONBOARDING}
screenOptions={() => {
return { gestureEnabled: false }
}}
>
{Object.entries(AppScreens).map(([key, value]) => (
<AppStack.Screen
key={key}
name={key as AppStacks}
component={value.component}
options={() => {
return {
title: value.title,
headerTitleAlign: 'center',
...(value.options || {}),
}
}}
/>
))}
</AppStack.Navigator>
)
}import { createBottomTabNavigator, BottomTabNavigationOptions } from '@react-navigation/bottom-tabs'
import { TabsStacks, TabsStackParamList, TabsStackScreenProps } from './types'
import { HomeScreen, ProfileScreen } from '../pages'
interface TabScreenOptions {
title: string
component: React.FC<TabsStackScreenProps<TabsStacks>>
options: BottomTabNavigationOptions
}
const TabScreens: Record<TabsStacks, TabScreenOptions> = {
[TabsStacks.HOME]: {
title: 'Home',
component: HomeScreen,
options: {},
},
[TabsStacks.PROFILE]: {
title: 'Profile',
component: ProfileScreen,
options: {},
},
}
const Tabs = createBottomTabNavigator<TabsStackParamList>()
export default () => {
return (
<Tabs.Navigator
initialRouteName={TabsStacks.HOME}
screenOptions={() => {
return {
headerShown: false,
}
}}
>
{Object.entries(TabScreens).map(([key, value]) => (
<Tabs.Screen
key={key}
name={key as TabsStacks}
component={value.component}
options={() => {
return {
tabBarLabel: value.title,
headerTitleAlign: 'center',
...(value.options || {}),
}
}}
></Tabs.Screen>
))}
</Tabs.Navigator>
)
}编辑src/App.tsx
// ...
import { NavigationContainer } from '@react-navigation/native'
import AppNavigation from './routes/AppNavigator'
export default function App() {
  useDeviceContext(tw)
  return (
    <SafeAreaProvider>
      <GestureHandlerRootView style={{ flex: 1 }}>
        <NavigationContainer>
          <AppNavigation />
        </NavigationContainer>
        <StatusBar style="auto" />
      </GestureHandlerRootView>
    </SafeAreaProvider>
  )
}
侧栏组件
pnpm add react-native-drawer-layout
npx expo install react-native-reanimated编辑src/pages/Profile/index.tsx和babel.config.js
module.exports = function (api) {
  api.cache(true)
  return {
    presets: ['babel-preset-expo'],
    plugins: ['react-native-reanimated/plugin'],
  }
}import { Drawer } from 'react-native-drawer-layout'
// ...
export default () => {
const [open, setOpen] = React.useState(false)
return (
<Drawer
open={open}
onOpen={() => setOpen(true)}
onClose={() => setOpen(false)}
renderDrawerContent={() => {
return (
<View style={tw`flex-1 items-center justify-center`}>
<Text>Drawer content</Text>
</View>
)
}}
>
<SafeAreaView style={tw`flex-1 items-center justify-center`}>
<Button
onPress={() => setOpen((prevOpen) => !prevOpen)}
title={`${open ? 'Close' : 'Open'} drawer`}
/>
</SafeAreaView>
</Drawer>
)
}状态管理
pnpm add zustand immer定义
新建src/models/counter.ts和src/models/selectors.ts
查看
import { create } from 'zustand'
import { immer } from 'zustand/middleware/immer'
import createSelectors from './selectors'
interface State {
  count: number
}
interface Action {
  inc: () => void
  dec: () => void
}
const initialState: State = {
  count: 0,
}
const counterStore = create<State & Action>()(
  immer((set, get) => ({
    count: 0,
    inc: () => set((state) => ({ count: state.count + 1 })),
    dec: () => set((state) => ({ count: state.count - 1 })),
  }))
)
export const useCounterStore = createSelectors(counterStore)
export function useCounterReset() {
  counterStore.setState(initialState)
}import { StoreApi, UseBoundStore } from 'zustand'
type WithSelectors<S> = S extends { getState: () => infer T }
? S & { use: { [K in keyof T]: () => T[K] } }
: never
const createSelectors = <S extends UseBoundStore<StoreApi<{}>>>(_store: S) => {
let store = _store as WithSelectors<typeof _store>
store.use = {}
for (let k of Object.keys(store.getState())) {
;(store.use as any)[k] = () => store((s) => s[k as keyof typeof s])
}
return store
}
export default createSelectors使用
编辑src/pages/Home/index.tsx和src/pages/Profile/index.tsx
查看
// ...
import { useCounterStore, useCounterReset } from '~/models'
export default ({ navigation }: Props) => {
  const count = useCounterStore.use.count()
  const inc = useCounterStore.use.inc()
  const dec = useCounterStore.use.dec()
  return (
    // ...
    <View style={tw`my-3 items-center justify-center`}>
      <Button title="increment" onPress={inc}></Button>
      <Text>{count}</Text>
      <Button title="decrement" onPress={dec}></Button>
    </View>
    <Button title="reset" onPress={useCounterReset}></Button>
    // ...
  )
}// ...
import { useCounterStore } from '~/models'
export default () => {
const { count, inc, dec } = useCounterStore()
return (
// ...
<View style={tw`mt-3 items-center justify-center`}>
<Button title="increment" onPress={inc}></Button>
<Text>{count}</Text>
<Button title="decrement" onPress={dec}></Button>
</View>
// ...
)
}持久化
注意,使用了MMKV之后需要打debug包才能进行调试
pnpm add react-native-mmkv新建src/utils/storage.ts和src/models/user.ts
查看
import { MMKV } from 'react-native-mmkv'
import { StateStorage } from 'zustand/middleware'

// 定义不同场景下的mmkv存储键
enum MMKVSceneKey {
  DEVICE = 'mmkv-device-uuid',
  USER = 'mmkv-user',
}
// 创建默认的 mmkv 实例
const storage = new MMKV()
function getItem<T>(key: string): T {
  const value = storage.getString(key)
  return value ? JSON.parse(value) ?? null : null
}
function setItem<T>(key: string, value: T) {
  storage.set(key, JSON.stringify(value))
}
function removeItem(key: string) {
  storage.delete(key)
}
export { storage, getItem, setItem, removeItem, MMKVSceneKey }

/** @description 用来给 zustand 持久化存储的方法 */
export const zustandStorage: StateStorage = {
  getItem: (key: string) => {
    const value = storage.getString(key)
    return value ?? null
  },
  setItem: (key: string, value) => {
    storage.set(key, value)
  },
  removeItem: (key: string) => {
    storage.delete(key)
  },
}import { create } from 'zustand'
import { immer } from 'zustand/middleware/immer'
import { createJSONStorage, persist } from 'zustand/middleware'
import createSelectors from './selectors'
import { MMKVSceneKey, zustandStorage } from '../utils'
interface State {
token: string
isLogged: boolean
}
interface Action {
setToken: (token: string) => void
removeToken: () => void
}
const initialState: State = {
token: '',
isLogged: false,
}
const userStore = create<State & Action>()(
immer(
persist(
(set, get) => ({
token: '',
isLogged: false,
setToken: (token) => set({ token, isLogged: true }),
removeToken: () => set({ token: '', isLogged: false }),
}),
{
//! 注意这里的 name 并不是创建 mmkv 实例的 ID,而是 mmkv 持久化数据的唯一 key
name: MMKVSceneKey.USER,
storage: createJSONStorage(() => zustandStorage),
}
)
)
)
export const useUserStore = createSelectors(userStore)
export function useUserReset() {
userStore.setState(initialState)
}🎉
到这里,其实这个基础项目的架子就已经算完成了,之后我想到什么补什么