初始化
我们在实例化一个Vue实例,也就是new Vue()时,实际上是执行src/core/instance/index.ts文件中定义的Vue函数
function Vue(options) {
  if (__DEV__ && !(this instanceof Vue)) {
    warn('Vue is a constructor and should be called with the `new` keyword')
  }
  this._init(options)
}通过查看Vue的function,我们知道Vue只能通过new关键字初始化,然后调用this._init方法,该方法在src/core/instance/init.ts文件中定义
Vue.prototype._init = function (options?: Record<string, any>) {
  const vm: Component = this
  // 省略一系列其它初始化的代码
  if (vm.$options.el) {
    vm.$mount(vm.$options.el)
  }
}Vue初始化主要就干了几件事情,合并配置,初始化生命周期,初始化事件中心,初始化渲染,初始化data、props、computed、watcher等等
Vue实例挂载
Vue中是通过$mount实例方法去挂载 dom 的,下面我们通过分析compiler版本的mount实现,相关源码在目录src/platforms/web/runtime-with-compiler.ts文件中定义:
const mount = Vue.prototype.$mount
Vue.prototype.$mount = function (el?: string | Element, hydrating?: boolean): Component {
  el = el && query(el)
  // 省略一系列初始化以及逻辑判断代码
  return mount.call(this, el, hydrating)
}我们发现最终还是调用了原先原型上的$mount方法挂载,原先原型上的$mount方法在src/platforms/web/runtime/index.ts文件中定义
Vue.prototype.$mount = function (el?: string | Element, hydrating?: boolean): Component {
  el = el && inBrowser ? query(el) : undefined
  return mountComponent(this, el, hydrating)
}我们发现$mount方法实际上会去调用mountComponent方法,这个方法定义在src/core/instance/lifecycle.ts文件中
export function mountComponent(
  vm: Component,
  el: Element | null | undefined,
  hydrating?: boolean
): Component {
  vm.$el = el
  // 省略一系列其它代码
  let updateComponent
  if (__DEV__ && config.performance && mark) {
    updateComponent = () => {
      // ...
      // 生成虚拟 vnode
      const vnode = vm._render()
      // ..
      // 更新 DOM
      vm._update(vnode, hydrating)
      // ..
    }
  } else {
    updateComponent = () => {
      vm._update(vm._render(), hydrating)
    }
  }

  const watcherOptions: WatcherOptions = {
    before() {
      if (vm._isMounted && !vm._isDestroyed) {
        callHook(vm, 'beforeUpdate')
      }
    },
  }
  // 省略一系列其它代码

  // 实例化一个渲染Watcher,在它的回调函数中会调用 updateComponent 方法
  new Watcher(vm, updateComponent, noop, watcherOptions, true /* isRenderWatcher */)
  // 省略一系列其它代码
  return vm
}从上面的代码可以看到,mountComponent核心就是先实例化一个渲染Watcher,在它的回调函数中会调用updateComponent方法,在此方法中调用vm._render方法先生成虚拟VNode,最终调用vm._update更新 DOM
创建虚拟VNode
Vue的_render方法是实例的一个私有方法,它用来把实例渲染成一个虚拟VNode。它的定义在src/core/instance/render.ts文件中
Vue.prototype._render = function (): VNode {
  const vm: Component = this
  const { render, _parentVnode } = vm.$options
  // 省略一系列代码

  let vnode
  try {
    setCurrentInstance(vm)
    currentRenderingInstance = vm
    // 调用 createElement 方法来返回 vnode
    vnode = render.call(vm._renderProxy, vm.$createElement)
  } catch (e: any) {
    handleError(e, vm, `render`)
    // ...
  } finally {
    currentRenderingInstance = null
    setCurrentInstance()
  }
  // 省略一系列代码

  vnode.parent = _parentVnode
  return vnode
}vm._render最终是通过执行createElement方法并返回的是vnode,它是一个虚拟 Node
Vue利用_createElement方法创建VNode,它定义在src/core/vdom/create-elemenet.ts文件中
export function _createElement(
  context: Component,
  tag?: string | Component | Function | Object,
  data?: VNodeData,
  children?: any,
  normalizationType?: number
): VNode | Array<VNode> {
  // 省略一系列非主线代码

  if (normalizationType === ALWAYS_NORMALIZE) {
    // 场景是 render 函数不是编译生成的
    children = normalizeChildren(children)
  } else if (normalizationType === SIMPLE_NORMALIZE) {
    // 场景是 render 函数是编译生成的
    children = simpleNormalizeChildren(children)
  }
  let vnode, ns
  if (typeof tag === 'string') {
    let Ctor
    ns = (context.$vnode && context.$vnode.ns) || config.getTagNamespace(tag)
    if (config.isReservedTag(tag)) {
      //...

      // 创建虚拟 vnode
      vnode = new VNode(
        config.parsePlatformTagName(tag),
        data,
        children,
        undefined,
        undefined,
        context
      )
    } else if (
      (!data || !data.pre) &&
      isDef((Ctor = resolveAsset(context.$options, 'components', tag)))
    ) {
      // component
      vnode = createComponent(Ctor, data, context, children, tag)
    } else {
      vnode = new VNode(tag, data, children, undefined, undefined, context)
    }
  } else {
    vnode = createComponent(tag as any, data, context, children)
  }
  if (isArray(vnode)) {
    return vnode
  } else if (isDef(vnode)) {
    if (isDef(ns)) applyNS(vnode, ns)
    if (isDef(data)) registerDeepBindings(data)
    return vnode
  } else {
    return createEmptyVNode()
  }
}_createElement方法有 5 个参数,context表示VNode的上下文环境,它是Component类型;tag表示标签,它可以是一个字符串,也可以是一个Component;data表示VNode的数据,它是一个VNodeData类型,可以在types/vnode.ts中找到它的定义;children表示当前VNode的子节点,它是任意类型的,需要被规范为标准的VNode数组
更新视图
完成视图的更新工作事实上就是调用了vm._update方法,这个方法接收的第一个参数是刚生成的Vnode,调用的vm._update方法定义在src/core/instance/lifecycle.ts文件中
Vue.prototype._update = function (vnode: VNode, hydrating?: boolean) {
  const vm: Component = this
  const prevEl = vm.$el
  const prevVnode = vm._vnode
  const restoreActiveInstance = setActiveInstance(vm)
  vm._vnode = vnode
  // 第一个参数为真实的node节点,则为初始化
  if (!prevVnode) {
    vm.$el = vm.__patch__(vm.$el, vnode, hydrating, false /* removeOnly */)
  } else {
    // 如果需要diff的prevVnode存在,那么对prevVnode和vnode进行diff
    vm.$el = vm.__patch__(prevVnode, vnode)
  }
  restoreActiveInstance()
  // update __vue__ reference
  if (prevEl) {
    prevEl.__vue__ = null
  }
  if (vm.$el) {
    vm.$el.__vue__ = vm
  }
  // if parent is an HOC, update its $el as well
  let wrapper: Component | undefined = vm
  while (
    wrapper &&
    wrapper.$vnode &&
    wrapper.$parent &&
    wrapper.$vnode === wrapper.$parent._vnode
  ) {
    wrapper.$parent.$el = wrapper.$el
    wrapper = wrapper.$parent
  }
}往后参考Diff 算法篇章
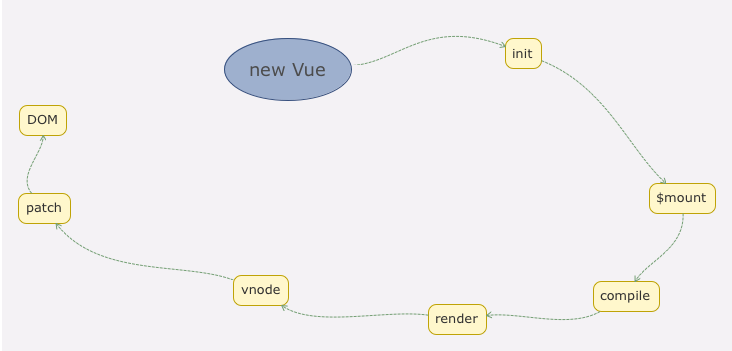
总结
那么至此我们从主线上把模板和数据如何渲染成最终的 DOM 的过程分析完毕了,我们可以通过下图更直观地看到从初始化Vue到最终渲染的整个过程